How to Create a Custom User Interface (CUI)
Overview
Using the Custom UI feature, you can upload a template designed by a designer to the AgileApps platform. A template is a layout created by the application developers which you can use to customize the look and feel of any AgileApps application. The user uploads this template to the AgileApps platform like any other document and generates an Access URL. When the user opens this Access URL, the template uploaded to the AgileApps platform is rendered in run time for the selected application.
Who can use this feature?
Any application developer who meets the following requirements can view this feature:
- In the Manage Tenant Capabilities page for a tenant, the Developer Tools option should be enabled for the user. For more information, see Tenant Capabilities.
- Under Access Management > Access Profiles > Administrative Permissions > Development Controls, the Use Development Features option should be enabled. For more information, see Access Profiles.
Prerequisites
To use this Templates feature, you should meet the following prerequisites:
- In the Configure Service Settings > Template Configuration section, provide the list of file extensions that you want to support for template installation. This allows the environment administrator to allow only some file extensions that support template installation. For more information about the default Whitelisted File Types, see [Template Configuration].
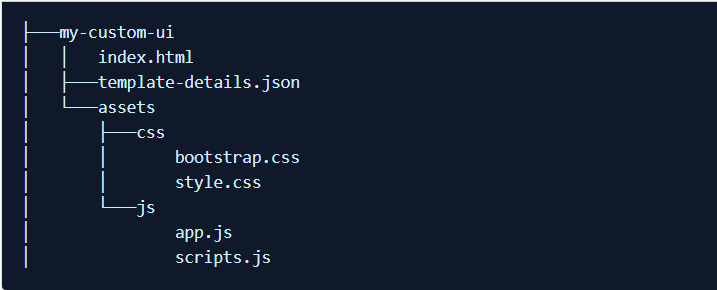
- The recommended file structure for packaging the custom user interface is shown in the following image:

- Further explanation of this folder structure is as follows:
- my-custom-ui: This is the root folder and it always exists. This root folder name can be anything.
- index.html: This file is the entry file and is mandatory for successful installation of the template.
- template-details.json: When you install the template in the AgileApps platform, the template name and the version is read from this internal JSON file. If this file is missing, then the template installation fails. This file is available inside the template.zip file and has the following file structure:
   {
    name: '{template unique name}',
    version: '{major.minor}'
   }
An example for a template name based on the above information is Test.1.
Basic Flow
Creating a new custom template for your AgileApps application involves the following steps:
Creating a Template
Let us look at the following aspects of template creation:
Creating the Template
- 1. Create a directory and git clone the boiler template from GitHub as follows:
/* Clone from git repository using git bash */
git clone https://github.com/agileapps-dev-com/agileapps-cui.git
- 2. Configure the webpack development server as follows:
- a. Go to agileapps-cui directory and open the webpack.config.js file in Notepad or any other text editor.
- b. Update the target value into your agileapps instance path. An example is as follows:
/* Update the target value into your agileapps instance path include port as well, if any. */
     proxy: [{
      context: ['/networking', '/ace-lib'],
      "target": "https://agileapps-instance-path",
      "secure": false,
      "changeOrigin": "true"
    }]
- 3. Install any development setup dependencies by running the following command:
npm install
- 4. Start the development server by running the following command in the command prompt:
npm run start:dev
- 5. Access the URL at
https://localhost:8054/simple/index.htmlwhere localhost is your machine name. - 6. Modify the content in
~/agileapps-cui/src/simple. You can create more CSS, HTML, and JavaScript files as per your requirement. However, ensure to adhere to the recommended file structure guideline as shown here:
Setting up the Template Artifacts
After you create the template, you have to package it for deployment. Archive the template you create by running the following command:
npm run archive simple
If you change the directory name or create a new directory, use that value instead of simple.
The package will be available in ~/agileapps-cui/dist/ directory.
Example of a Sample Template
You can create a simple CUI using the index.html file listed here.
<!doctype html>
<html lang="en">

<head>
  <base href="./">
  <!-- Required meta tags -->
  <meta charset="utf-8">
  <meta name="viewport" content="width=device-width, initial-scale=1, shrink-to-fit=no">

  <link rel="stylesheet" href="/ace-lib/styles.css" />
  <link rel="stylesheet" href="/ace-lib/assets/themes/default/css/main.css" />

  <!--CUI specified css files -->
   <link rel="stylesheet" href="assets/css/styles.css" />

  <title>My Custom User Interface for AgileApps </title>
</head>

<body>
	<!-- The Custom HTML template content goes here -->

  <!-- platform assets -->
  <script type="text/javascript" src="/ace-lib/runtime.js"></script>
  <script type="text/javascript" src="/ace-lib/es2015-polyfills.js" nomodule></script>
  <script type="text/javascript" src="/ace-lib/polyfills.js"></script>
  <script type="text/javascript" src="/ace-lib/scripts.js"></script>
  <script type="text/javascript" src="/ace-lib/vendor.js"></script>
  <script type="text/javascript" src="/ace-lib/main.js"></script>

 <!--CUI specified JS files -->
  <script src="assets/js/scripts.js"></script>

</body>

</html>
Installing the Template
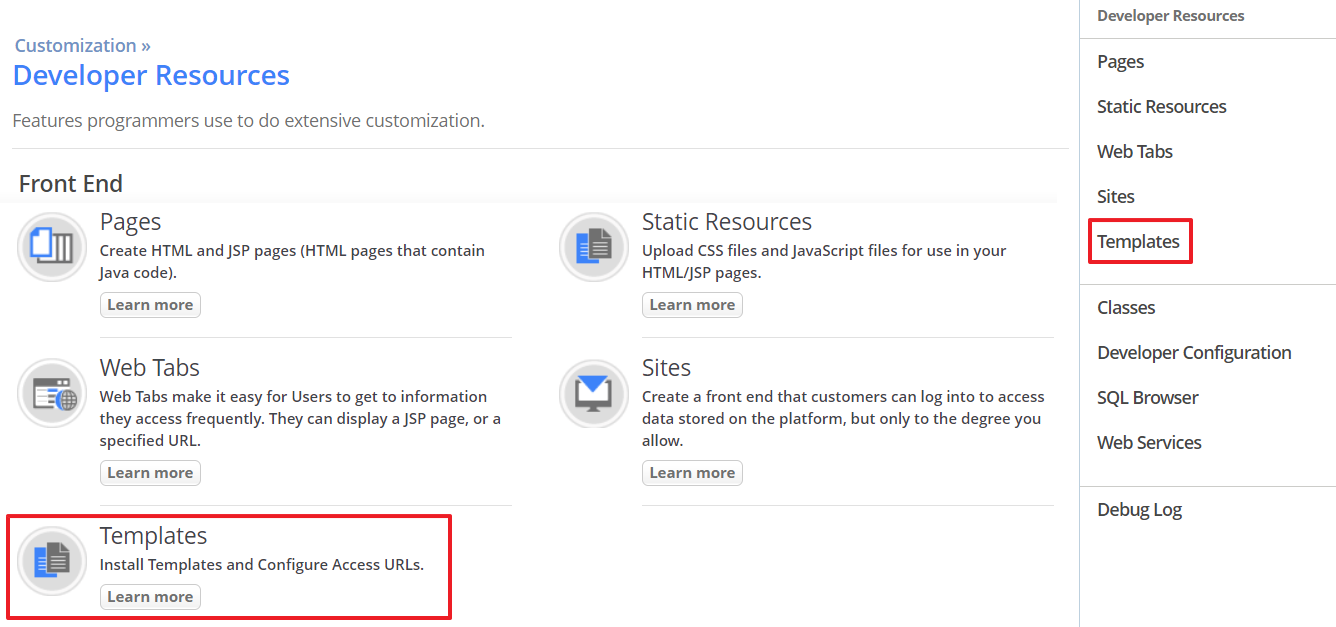
- 1. Go to Settings > Customization > Developer Resources, and select Templates from the menu as shown in the following image:
- 3. In the Install Template page, click Choose File and select the zip file for your template. Only .zip file format is supported. Other compression formats like RAR is not supported.
- The template zip file has the following considerations for the characters used in the zip file:
- The zip file name should only contain alphanumeric characters (a-z, A-Z, 0-9), hyphen(-), dot(.), or an underscore(_).
- The folder name inside the zip file should only contain alphanumeric characters (a-z, A-Z, 0-9), hyphen(-), or dot(.), or an underscore (_). Also, the folder name cannot start with a dot(.) symbol.
- The file name inside the zip file should only contain alphanumeric characters (a-z, A-Z, 0-9), hyphen(-), or dot(.), or an underscore (_).
- The template version inside the template-details.json file should be in {major.minor} format. For example, 1.2.
- The template name inside the template-details.json file should only contain alphanumeric characters (a-z, A-Z, 0-9), hyphen(-), or dot(.), or an underscore (_). Also, it should start with an alphabet and end with an alphanumeric character.
- The template zip file has the following considerations for the characters used in the zip file:
- 4. Click Next and then click Install. On successful installation, you will see a message on-screen conveying the same.
- 5. This concludes the procedure for installing the template.
Updating the Existing Template
- 1. Go to Settings > Customization > Developer Resources, and select Templates
- 2. In the All Templates screen, click Install.
- 3. In the Select Template File screen, select the template file which you want to update and click Next.
- 4. In the next screen, you will see warning message stating that a template with the same name already exists. As a backup, you can download the existing template by clicking the Download button as shown in the following image:
Configuring the Access URL
Using the Access URL, you can access the AgileApps application to which you apply the custom templates.
- 1. After you install the template, from the Templates list page, click Configure Access URL as shown in the following image:
- 2. In the All Configured Access URLs page, you will see a list of all the configured access URLs. You can enable or disable an access URL from this page. To configure a new access URL, click New Access URL.
Note: If you have not updated a namespace in the Developer Configuration section of the Developer Resources page, then the system prompts you with a message to update the namespace. Click the URL to update the namespace. Provide a name and save it. This is a mandatory step as every tenant should have a unique namespace. For more information about the namespace, see Developer Configuration.
- 3. In the Configure Access URL page, provide the following details in the Access URL Information section:
Field Description Select Application Select an application from the drop-down list for which you want to apply this custom template. Access URL Alias Provide an alias for the Access URL. This alias gets appended to the Access URL which is used to access the application. The Access URL alias should contain only alphanumeric characters [A-Z,a-z,0-9], or an underscore(_), or a hyphen(-) and must always start with alphabetical characters and cannot end with an underscore(_), or a hyphen(-).Also, it cannot contain spaces or be left blank. Access URL This is created dynamically based on what you provide for the Application Alias field. The format for the Access URL is http://{domain}/networking/{apps}/{namespace}/{alias_name}/, where the Application Alias is appended at the end. Select Template Select a template for the drop-down list. This is the custom template which the platform applies to your application. Mandatory User Login If you select this checkbox, the user is by default taken to the platform login page. This happens if the user is opening the Access URL for the first time. After successful login in the platform login page, the user is taken to the template landing page. If you do not select this checkbox, the user is taken directly to the template landing page (the target index.html page) on clicking the Access URL. Enable Access URL Use this checkbox to enable or disable the Access URL.
- 4. This concludes the procedure for configuring the Access URL.
Deleting the Application
When you delete an application, all the associated template Access URLs are deleted from the AgileApps platform.


