Difference between revisions of "List Views"
imported>Aeric |
imported>Aeric |
||
| Line 8: | Line 8: | ||
====Sorting a List View==== | ====Sorting a List View==== | ||
:List Views can be sorted by clicking on a column heading. You can then choose between an Ascending and Descending sort. | :List Views can be sorted by clicking on a column heading. You can then choose between an Ascending and Descending sort. | ||
:If a [[Multi-Object Lookup]] field is selected for sorting, an additional field appears that asks you to select the target-object for the Lookup. All records that target that object are included in the view, and they are sorted using the [[Record Locator]] values defined for that object. (For example, case number for the Cases object, first and last name for the Users object.) | |||
::: In a sense, choosing a multi-object lookup field for sorting also acts as a filter--because any records that target other objects are not included in the view. (It would be difficult to sort records that pointed to different objects. For example, supposed that 3 records point to Apples, and another 3 point to Oranges. Suppose further that Apples are sorted by variety, and Oranges by size and color. A general solution that allows deterministic results would be complex to implement, computationally-intensive, and only rarely used.) | |||
====Viewing and Editing Records==== | ====Viewing and Editing Records==== | ||
Revision as of 01:16, 28 April 2015
A List View displays a list of records. You can get to a List View by clicking any tab in your application.
About List Views
In a List View, records are displayed in a grid, like a spreadsheet. The tabs in your case management application display cases and tasks, for example. But list views are also used for objects, reports, and many other platform components.
Application tabs like Cases and Tasks have a sidebar that lets you customize the view and create new ones. Administrative views, on the other hand, use the available space to show as much information as possible. For many of those views, the alphabetic filtering option makes it easier to find the record(s) you're looking for.
Common operations provided by all views include:
- Click a column heading to sort the records on that column.
(The column icon changes to show that it has been sorted.) - Click again to reverse the sort.
- Type in a value and click the Magnifier icon
 to search for a record with that value. Click the down arrow to get a list of things you've searched on before.
- Click a column heading to sort the records on that column.
Working with List Views
Sorting a List View
- List Views can be sorted by clicking on a column heading. You can then choose between an Ascending and Descending sort.
- If a Multi-Object Lookup field is selected for sorting, an additional field appears that asks you to select the target-object for the Lookup. All records that target that object are included in the view, and they are sorted using the Record Locator values defined for that object. (For example, case number for the Cases object, first and last name for the Users object.)
- In a sense, choosing a multi-object lookup field for sorting also acts as a filter--because any records that target other objects are not included in the view. (It would be difficult to sort records that pointed to different objects. For example, supposed that 3 records point to Apples, and another 3 point to Oranges. Suppose further that Apples are sorted by variety, and Oranges by size and color. A general solution that allows deterministic results would be complex to implement, computationally-intensive, and only rarely used.)
Viewing and Editing Records
- Click an entry in the list to visit the record.
Searching a List View
- At the top of the window, type text into the search field and press Enter or click the Magnifier icon
 to select records whose contents contain the value you specify. Optionally, click the down arrow at the end of the box to specify which objects to search.
Multi Record Actions
These actions let you assign or claim ownership of multiple records at one time.
They are available in the Cases object and the Tasks Object.
To change ownership of multiple records:
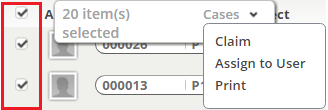
- In a View, click Checkbox(es) to select individual records
A pop-up appears showing the number of selected records and the object name. - Click the object name to display the list of additional actions, as shown here:
- Select one of the options.
- Claim - A confirmation dialog appears.
- Assign Owner - Choose the new owner.
- Click [Ok] to complete the action
To select all records in a view:
- Click the selection box at the top of the column
- The selection box changes from this:
 to this:
  for all records in the view.
To clear (uncheck) the checkboxes from all selected records:
- Click the selection box at the top of the column
- The selection box changes from this:
 to this:
  for all selected records.
Using the Alphabetic Index
- Some views contain an alphabetic index at the top of the page, to help you find the record(s) you're interested in:
- If there is sidebar that lets you customize the current view and/or create your own views, that index generally does not appear. (It appears in administrative views that don't have those capabilities, in views where it is considered essential.)
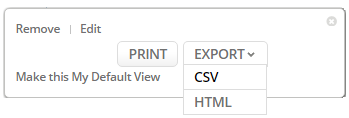
Printing a List View
Customizing a List View
When the sidebar presents you with a list of views, you can customize the current view, in addition to making new ones. You can choose the columns that are displayed in the list, and the order in which they appear. You can make different views that are available to users in different roles.
To customize a view:
- Click the down arrow (
 ) next to the name of the currently selected view.
A popup appears with view options: - Click Edit.
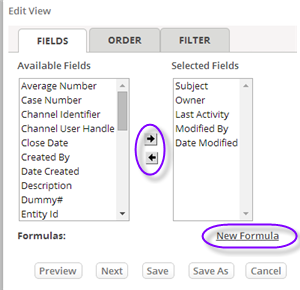
The view edit-window appears: - In the first tab, select the fields to display.
- Click New Formula to define a formula field that appears only in this view.
The Formula Builder appears. - In the next tab, specify the order in which they should appear in the view.
- In the last tab, create a filter, to determine which records to include in the view.
- Use the View Filter options to filter by record ownership, by date, or by field value.
- Click [Preview] to see the modified view.
- Click [Save] save it as the current view, or [Save As] to make a new view.
(Standard, built-in views cannot be modified. For them, Save makes a copy, as well as Save As. - While saving the view, you can give it a name and determine who can see it.


