Difference between revisions of "Process Models"
imported>Aeric |
imported>Aeric |
||
| Line 46: | Line 46: | ||
In addition to the Save icon seen earlier, the toolbar provides other icons that help you build processes: | In addition to the Save icon seen earlier, the toolbar provides other icons that help you build processes: | ||
:[[File:ProcessEditIcons.png]] | :[[File:ProcessEditIcons.png]] | ||
:* '''Cut, Copy, Paste, Delete -''' The standard editing operations to move or copy the selected element(s) to the clipboard (cut/copy), to copy the contents of the clipboard to the process (paste), or remove the selected element(s). | |||
:* '''Undo, Redo -''' Take back the last change, or reinstate it. | |||
:* '''Alignment and Sizing -''' Align the middles or centers of elements, or make them the same size. | |||
:* '''Line "Bend Points" -''' A red dot appears at the corner of any line that isn't totally straight. You change the shape of a line by dragging that dot. Use these controls to add an extra dot to an already-bent line, or to add a dot to a straight line. You can also use the controls to remove a dot, straightening the line at that point. | |||
:* '''Zoom Controls -''' Zoom in or out. Set page size. | |||
:* '''Syntax Check -''' Possibly the most useful icon in the group. Click this button to check the drawing. A large red "X" appears below any element that has a problem. Hover over the element to get an error message. | |||
Here are some other keys you can use: | Here are some other keys you can use: | ||
Revision as of 00:23, 6 September 2012
{solution} > Designer > Processes (solution-global processes)
{solution} > Designer > Case Types > {case type} > Processes (case-specific processes)
About Processes
Processes are sequences of tasks (or steps) that are carried out by Case Workers. The sequence, or process flow can do conditional branching based on Case Data. Additionally, Timers can be created to perform actions at specified times.
Business Process Modeling (BPM) is concerned with creating a computerized process model that users can interact with. Such models gives each user the information they need to carry out the next step in the process, and they allow for accurate record-keeping.
Working with Processes
Creating or Modifying a Process
To create or modify a process:
- From the Processes tab, click [New Process] or click an existing Process.
The Process Editor opens. - Drag process elements from the sidebar (the Palette) into the main panel
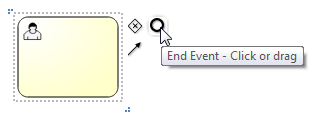
- Click a task in the main panel to display the connection-Arrow icon, along with several convenience elements:
- The convenience elements have the icons you see in the sidebar. Hover over them to see a description:
- Decision Switch - A Decision Switch element is added to the process (see below), with a connection from the task
- End Event - An End Event element is added to the process, connected to the task
- Cancel Timer - A Cancellation Timer is added to the task (see below).
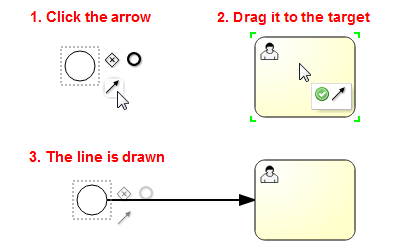
- The other element is the connection arrow. Drag it to another element to draw a connection between them:
- Press Ctrl+S or click the Save icon to save your changes and close the window, or simply close the window to exit without saving changes.


Process Elements
- User Task - This is a task that will be carried out by a user. (You can add instructions to help them out.)
Requirements:
- Define either the Role(s) that will be responsible for the task, or the Rule Set that will determine the owner. (You cannot save the task until a mechanism for determining its owner has been established.)
- Define the Form the task owner will use to view (and possibly update) the Case the task is part of. (The default Form can be used, but it is likely to be more helpful to restrict the view to the information needed to carry out the task.)
- User Task - This is a task that will be carried out by a user. (You can add instructions to help them out.)
- Send an Email - Automated notifications
- Content Generation Task - __TBD: Create a document, optionally using one of the Document Templates __
- Execute RuleSet - Execute Rules in a Rule Set, to carry out a number of tasks
- Decision Switch - Create a branch in the process flow, depending on criteria you specify.
- After creating the decision-switch node, click on the arrows coming from the node to specify criteria. When the specified criteria evaluate as true, that branch is taken.
- For compound conditions, chain one Decision Switch into another. So if the branch from the first Decision Switch is taken when order_amount >= 10000 and a branch from the second is taken when order_amount < 100000, then the second branch is taken when the order is between $10,000 and $100,000.
- Parallel Gateway - __TBD: Allow tasks to proceed in parallel. __
- Start Event - Specify the starting point for the process. (The start point is required.)
- Cancel Timer - Specify an interval after which the task will be automatically canceled.
- Reminder Timer - Specify an interval after which a reminder will be sent to the task owner(s).
- End Event - Specify an endpoint for the process. (At least one end point is required.)
- Sequence Flow - Draw a connector between two tasks, to create a sequence
Using the Process Editor
In addition to the Save icon seen earlier, the toolbar provides other icons that help you build processes:

- Cut, Copy, Paste, Delete - The standard editing operations to move or copy the selected element(s) to the clipboard (cut/copy), to copy the contents of the clipboard to the process (paste), or remove the selected element(s).
- Undo, Redo - Take back the last change, or reinstate it.
- Alignment and Sizing - Align the middles or centers of elements, or make them the same size.
- Line "Bend Points" - A red dot appears at the corner of any line that isn't totally straight. You change the shape of a line by dragging that dot. Use these controls to add an extra dot to an already-bent line, or to add a dot to a straight line. You can also use the controls to remove a dot, straightening the line at that point.
- Zoom Controls - Zoom in or out. Set page size.
- Syntax Check - Possibly the most useful icon in the group. Click this button to check the drawing. A large red "X" appears below any element that has a problem. Hover over the element to get an error message.

Here are some other keys you can use:
- Click and drag -Move an element to a new location.
- Ctrl+A - Select all. Good for repositioning all elements at once.
- Ctrl+Click - Add an element to the set of selected elements, or remove it if already selected.