Difference between revisions of "HowTo:Create a JSP Page and Java Controller"
From AgileApps Support Wiki
imported>Aeric |
imported>Aeric |
||
| Line 9: | Line 9: | ||
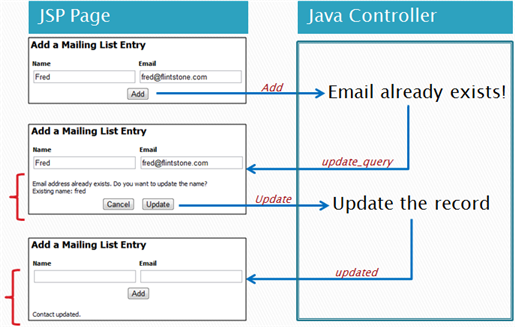
A sample interaction scenario might look like this: | A sample interaction scenario might look like this: | ||
:[[File:jsp_controller_scenario.png]] | :[[File:jsp_controller_scenario.png]] | ||
::* | ::* The arrows going to the controller show the value of the <tt>action</tt> variable that is passed from the JSP Page. | ||
::* The arrows going to the JSP Page show the value of the <tt>control</tt> variable that is passed from the controller | |||
::: (The names of the variable are determined by convention.) | |||
This diagram shows how the interactions between the JSP Page and controller class take place: | This diagram shows how the interactions between the JSP Page and controller class take place: | ||
Revision as of 00:29, 3 August 2012
|
For: Developers See more: |
Overview
In this guide, you create a JSP Page and a Controller Class that interact to:
- Add records to a Mailing List object
- Do a SQL search for (one or more) records
- Update records
A sample interaction scenario might look like this:
- The arrows going to the controller show the value of the action variable that is passed from the JSP Page.
- The arrows going to the JSP Page show the value of the control variable that is passed from the controller
- (The names of the variable are determined by convention.)

This diagram shows how the interactions between the JSP Page and controller class take place:

Prerequisites
- A "Mailing List" object must created, with two fields: contact_name and contact_email
Developing the Application
Create the Java class
- Follow the instructions at Add a Class to create AddUpdateController_YOURNAME
- Copy and paste the contents of AddUpdateController.java into the Class
- Save the class
Create the JSP Page
- Follow the instructions at Add a Page to create AddUpdateYOURNAME.jsp
- Copy and paste the contents of AddUpdate.jsp
- Save the JSP page
Try it Out
To test the project, visit the following URL:
- https://{yourDomain}/networking/pages/AddUpdate.jsp
(A valid username and password is required to log in to the platform.)