Difference between revisions of "Part 5: Create a Web Form"
From AgileApps Support Wiki
Wikieditor (talk | contribs) (Created page with "In this part of the exercise, you define a Web Form for Orders for use in on an external site. # Because a Web Form is meant for external customers, it requires two additional...") |
Wikieditor (talk | contribs) |
||
| (2 intermediate revisions by the same user not shown) | |||
| Line 3: | Line 3: | ||
## Go to the Configuration page, under the Customization tile, click Objects. Navigate to Orders > Fields. | ## Go to the Configuration page, under the Customization tile, click Objects. Navigate to Orders > Fields. | ||
## Create two new fields: From Name (Text Field) and From Address (Email Address). | ## Create two new fields: From Name (Text Field) and From Address (Email Address). | ||
# Go to the Configuration page, under the Customization tile | # Go to the '''Configuration''' page, under the '''Customization''' tile '''click Objects'''. Navigate to '''Orders''' > '''Forms''' > '''Default Layout'''. | ||
# Click Clone Layout. | # Click '''Clone Layout'''.<br><br>[[File:Objects_Orders_Forms_FormDefaultLayout_CloneLayout.png|800px]]<br><br> | ||
# For the Name, type WebOrderLayout, and then select the Web Forms option. | # For the Name, type WebOrderLayout, and then select the Web Forms option.<br><br>[[File:Clone_Layout.png|800px]]<br><br> | ||
#: Accept the note that some fields are mandatory for the selected layout and click '''Save'''. | |||
#: Accept the note that some fields are mandatory for the selected layout and click Save. | |||
# Add a Form Control of type Section to the top of the Form, named Submitter Information. | # Add a Form Control of type Section to the top of the Form, named Submitter Information. | ||
# As the From Name and From Address fields already appear in the Basic Information section by default, move them to the new Submitter Information section. | # As the From Name and From Address fields already appear in the Basic Information section by default, move them to the new Submitter Information section. | ||
# Moreover, add Field Subject from the Elements panel to the Submitter Information section. | # Moreover, add Field Subject from the Elements panel to the Submitter Information section. | ||
#:'''Note:''' All mandatory fields as mentioned in the note above now belong to your Web Form. | #:'''Note:''' All mandatory fields as mentioned in the note above now belong to your Web Form.<br><br>[[File:Form _WebOrderLayout.png|800px]]<br><br> | ||
# Click Save Changes. | # Click Save Changes. | ||
# Moreover, edit the properties of the fields '''From Name''', '''From Address''', '''Subject''', and '''Description''' to make them all Required fields. | # Moreover, edit the properties of the fields '''From Name''', '''From Address''', '''Subject''', and '''Description''' to make them all Required fields.<br><br>[[File:Change_Field_Properties.png|800px]]<br><br> | ||
# Go to the '''Configuration''' page, under the '''Customization''' tile, click '''Objects'''. Navigate to '''Orders''' > '''Web Forms''' and click '''New Web Form'''. | # Go to the '''Configuration''' page, under the '''Customization''' tile, click '''Objects'''. Navigate to '''Orders''' > '''Web Forms''' and click '''New Web Form'''. | ||
# Fill-in the fields as shown in the following screenshot: | # Fill-in the fields as shown in the following screenshot: | ||
#: Choose '''MyWebForm''' as Title and provide a Description. For the Generate option, the Case Form Link setting means that you will be given a URL link for the Web Form. Select your WebOrderLayout Form from the drop-down and provide your own User Profile. | #: Choose '''MyWebForm''' as Title and provide a Description. For the Generate option, the Case Form Link setting means that you will be given a URL link for the Web Form. Select your WebOrderLayout Form from the drop-down and provide your own User Profile.<br><br>[[File:New_Web_Form MyWebForm.PNG|900px]]<br><br> | ||
# Click Save. | # Click Save. | ||
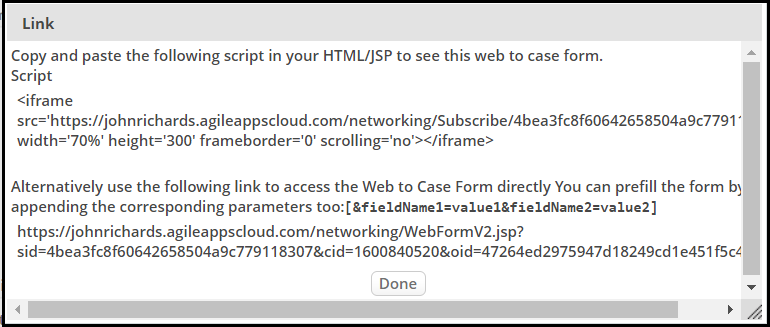
# A Link box opens with instructions for copying and pasting the provided script: | # A Link box opens with instructions for copying and pasting the provided script:<br><br>[[File:Web_Form_Script.PNG|800px]]<br><br> | ||
#: Follow the “alternative directions” by copying and pasting the provided URL into a new Web browser tab to see your resulting Web Form: | #: Follow the “alternative directions” by copying and pasting the provided URL into a new Web browser tab to see your resulting Web Form:<br><br>[[File:Web_Form Browser.PNG|900px]]<br><br> | ||
# Optionally, edit the Web Form to generate customizable HTML instead: | # Optionally, edit the Web Form to generate customizable HTML instead: | ||
## Go to the '''Configuration''' page, under the '''Customization''' tile, click '''Objects'''. Navigate to '''Orders''' > '''Web Forms'''. | ## Go to the '''Configuration''' page, under the '''Customization''' tile, click '''Objects'''. Navigate to '''Orders''' > '''Web Forms'''. | ||
## Edit the Web Form MyWebForm as shown, specifying Customizable HTML for the Generate option and selecting the highlighted fields: | ## Edit the Web Form MyWebForm as shown, specifying Customizable HTML for the Generate option and selecting the highlighted fields:<br><br>[[File:Objects_Orders_Web_Forms_MyWebForm.png]]<br><br> | ||
## Click '''Save'''. | ## Click '''Save'''. | ||
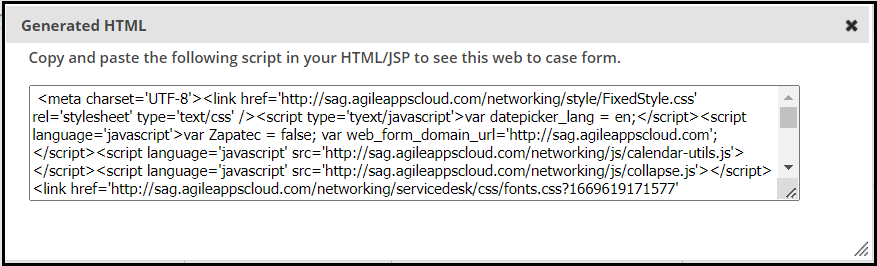
## Click '''Generate HTML'''. | ## Click '''Generate HTML'''.<br><br>[[File:Customizable_Web_Form Generate_HTML.PNG|800px]]<br><br> | ||
## Copy and paste the provided code into a Text editor, such as Notepad. Save the file with an HTML extension (for example, MyWebOrder.html). | ## Copy and paste the provided code into a Text editor, such as Notepad. Save the file with an HTML extension (for example, MyWebOrder.html). | ||
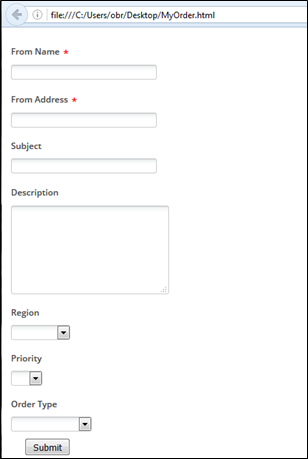
## Double-click on the HTML file saved above to open it in a new Web browser tab: | ## Double-click on the HTML file saved above to open it in a new Web browser tab:<br><br>[[File:MyOrder_Web_Form.png]]<br><br> | ||
# Housekeeping: Remove fields From Name and From Address from the Default Layout form of the Orders object as they are only required on the Web Form: | # Housekeeping: Remove fields From Name and From Address from the Default Layout form of the Orders object as they are only required on the Web Form: | ||
## Go to the '''Configuration''' page, under the '''Customization''' tile, click '''Objects'''. Navigate to '''Orders''' > '''Forms'''. | ## Go to the '''Configuration''' page, under the '''Customization''' tile, click '''Objects'''. Navigate to '''Orders''' > '''Forms'''. | ||
## Select Default Layout. Remove fields From Name and From Address from the section Basic Information. | ## Select '''Default Layout'''. Remove fields '''From Name''' and '''From Address''' from the section '''Basic Information'''. | ||
## Click '''Save Changes'''. | ## Click '''Save Changes'''. | ||
===Taking It Further=== | ===Taking It Further=== | ||
To extend what you learned in this exercise, use the AgileApps Cloud wiki pages (http://agileappscloud.info/) to learn how to implement Form Scripts in your AgileApps application. | To extend what you learned in this exercise, use the AgileApps Cloud wiki pages (http://agileappscloud.info/) to learn how to implement Form Scripts in your AgileApps application. | ||
------------------------------------------------------------------------------------------------------------------------------------------------------------------------------------------------------------------------------------------------------------------------ | |||
:{| border="0" align="left" cellpadding="5" cellspacing="1" | |||
| | |||
[[Part 4: Assign a Form to an Application Role|Previous]] | |||
|} | |||
:{| border="0" align="right" cellpadding="5" cellspacing="1" | |||
| | |||
[[Exercise 05: Building a Process Model|Next]] | |||
|} | |||
Latest revision as of 10:55, 14 December 2022
In this part of the exercise, you define a Web Form for Orders for use in on an external site.
- Because a Web Form is meant for external customers, it requires two additional fields which you need to create first:
- Go to the Configuration page, under the Customization tile, click Objects. Navigate to Orders > Fields.
- Create two new fields: From Name (Text Field) and From Address (Email Address).
- Go to the Configuration page, under the Customization tile click Objects. Navigate to Orders > Forms > Default Layout.
- Click Clone Layout.

- For the Name, type WebOrderLayout, and then select the Web Forms option.
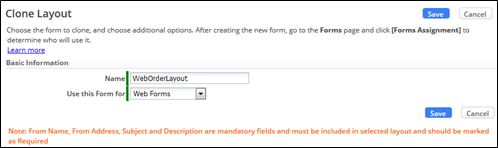
- Accept the note that some fields are mandatory for the selected layout and click Save.
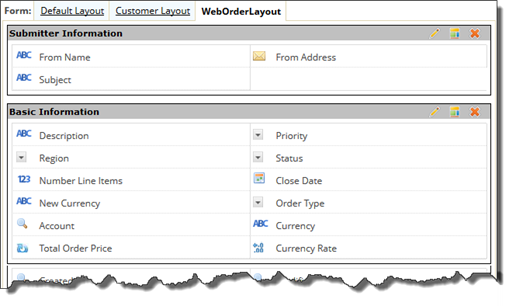
- Add a Form Control of type Section to the top of the Form, named Submitter Information.
- As the From Name and From Address fields already appear in the Basic Information section by default, move them to the new Submitter Information section.
- Moreover, add Field Subject from the Elements panel to the Submitter Information section.
- Note: All mandatory fields as mentioned in the note above now belong to your Web Form.
- Note: All mandatory fields as mentioned in the note above now belong to your Web Form.
- Click Save Changes.
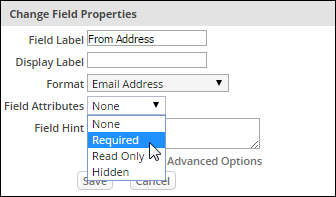
- Moreover, edit the properties of the fields From Name, From Address, Subject, and Description to make them all Required fields.
- Go to the Configuration page, under the Customization tile, click Objects. Navigate to Orders > Web Forms and click New Web Form.
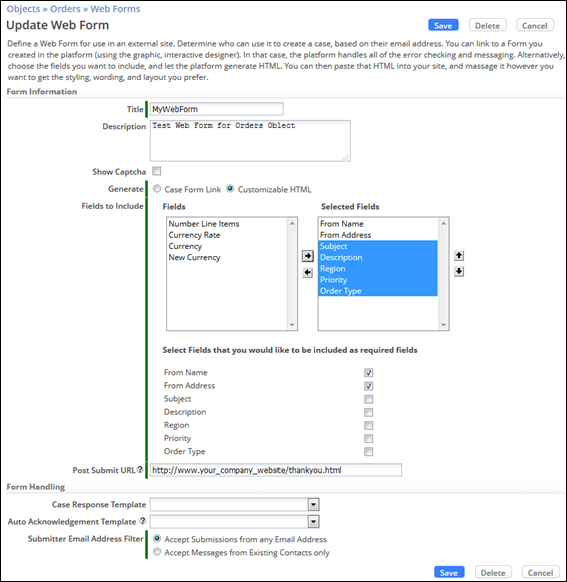
- Fill-in the fields as shown in the following screenshot:
- Choose MyWebForm as Title and provide a Description. For the Generate option, the Case Form Link setting means that you will be given a URL link for the Web Form. Select your WebOrderLayout Form from the drop-down and provide your own User Profile.
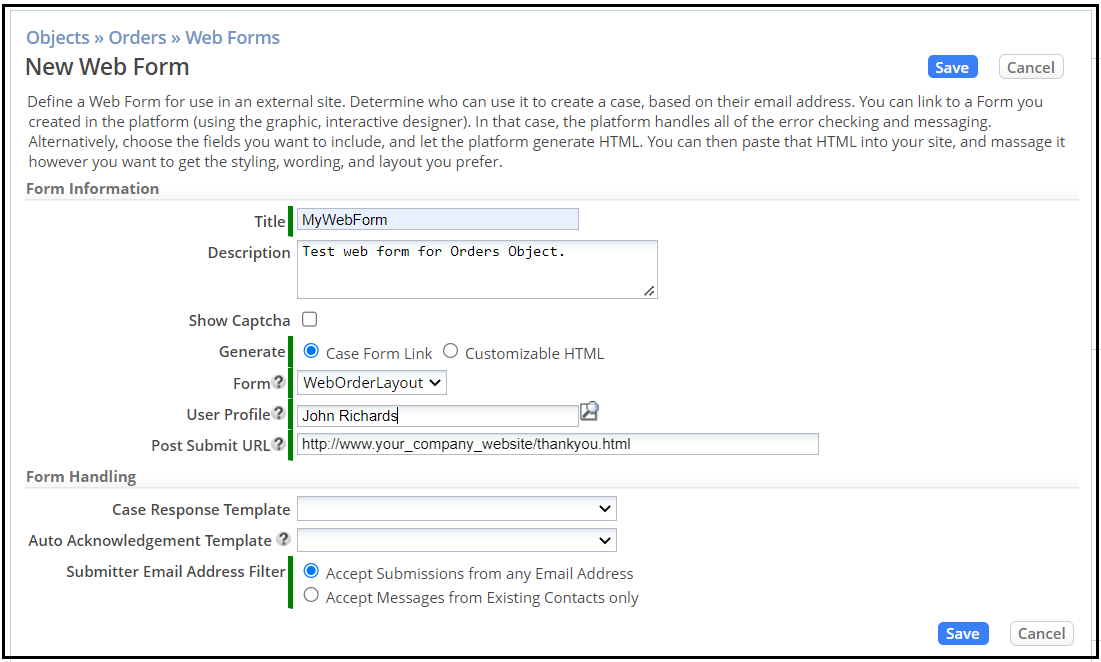
- Choose MyWebForm as Title and provide a Description. For the Generate option, the Case Form Link setting means that you will be given a URL link for the Web Form. Select your WebOrderLayout Form from the drop-down and provide your own User Profile.
- Click Save.
- A Link box opens with instructions for copying and pasting the provided script:
- Follow the “alternative directions” by copying and pasting the provided URL into a new Web browser tab to see your resulting Web Form:
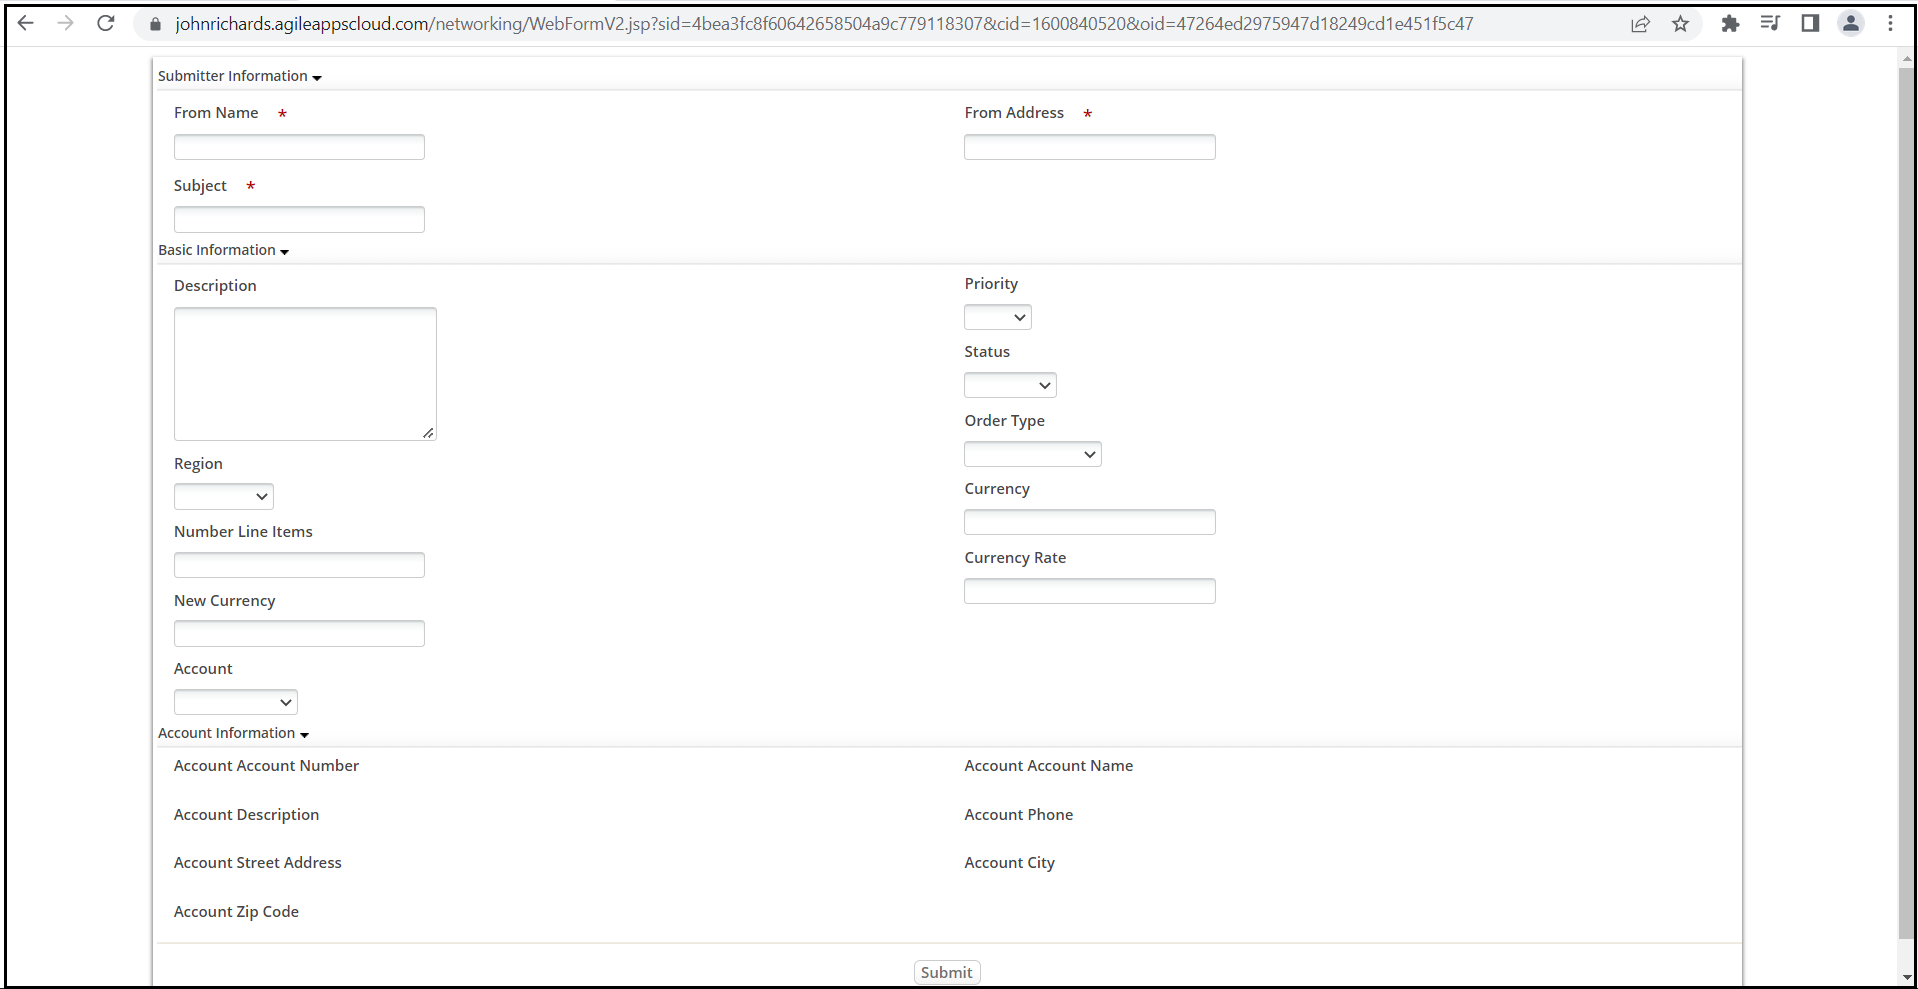
- Follow the “alternative directions” by copying and pasting the provided URL into a new Web browser tab to see your resulting Web Form:
- Optionally, edit the Web Form to generate customizable HTML instead:
- Go to the Configuration page, under the Customization tile, click Objects. Navigate to Orders > Web Forms.
- Edit the Web Form MyWebForm as shown, specifying Customizable HTML for the Generate option and selecting the highlighted fields:
- Click Save.
- Click Generate HTML.
- Copy and paste the provided code into a Text editor, such as Notepad. Save the file with an HTML extension (for example, MyWebOrder.html).
- Double-click on the HTML file saved above to open it in a new Web browser tab:
- Housekeeping: Remove fields From Name and From Address from the Default Layout form of the Orders object as they are only required on the Web Form:
- Go to the Configuration page, under the Customization tile, click Objects. Navigate to Orders > Forms.
- Select Default Layout. Remove fields From Name and From Address from the section Basic Information.
- Click Save Changes.


Taking It Further
To extend what you learned in this exercise, use the AgileApps Cloud wiki pages (http://agileappscloud.info/) to learn how to implement Form Scripts in your AgileApps application.