Views
Workspace > {object} > Wrench icon File:WrenchIcon.jpg > Edit this View
The default Object View displays all records in the Object. A custom View lets you determine which records are visible, which fields are displayed, and who can use that View. Such Views let you organize your data in a way that is meaningful, along with optional settings to customize and save views for reference or analysis.
About Views
With your data loaded into the platform, you can start creating custom views to convey specific information you want your team to see. By selecting the fields you want and assigning a variety of filters, you can isolate key information quickly and easily.
Users can define new views, so an entire team or a select group can share information. Multiple Views compartmentalize information about an object for quick access to records.
Views offer Visibility controls that grant view and edit rights to specific Users, Teams or Roles.
View Display Types
Using Views
Inline Editing of Rows in a List View
When records are displayed in a spreadsheet-style grid (a list view), you can double-click in a row to edit the fields in it, without having to visit the record-detail page.
Then:
- Press the Enter key to save changes for the row you're editing.
- Press the Esc key to abort.
- Use Tab and Shift+Tab to move between fields.
Searching and Filtering
Use the Search bar at the top of the window select records whose contents contain the value you specify:
Use the Filter icon File:FilterIcon.jpg to bring up a dialog you can use to do sophisticated filtering based on field contents:
Working with Views
View Options
Use the Wrench icon to customize the current view or build new views for you and your team.
- Edit this View - Make changes to the current view
- New View - Create a new View of this Object
- Delete this View - Delete the view, putting it into the Recycle Bin
- Make this My Default View - Use this View whenever you visit this object
- Print this View - Generate an HTML you can print or download from your browser.
- Export to Excel - Generate an Excel file you can open or download from your browser.
- Display Record Counts - Display the number of records in the current view and total the number of records stored in the database for this object.
Note: If your view of an Object has limits, the Record Count dialog displays the number of records you have permission to view, as well as the total number of records in the database.
- Learn more: Role Based Access Permissions.
Edit this View
Although users can edit both Standard Views and My Views, it is strongly recommended that Standard Views not be changed. If necessary, save the Standard View with a new name, and make the changes there.
Learn more: View Types
Users that have the Create/Delete Views/Reports/Homepages permission can edit Standard Views
To edit a view:
- Open any object
- Select a View
- Click the Wrench icon File:WrenchIcon.jpg and select Edit this View
New View
To create a New View:
- Open any object
- Select a View
- Click the Wrench icon File:WrenchIcon.jpg and select New View
Additional View Settings
Several action buttons are available from each step in this process:
- [Preview] - display the view before saving
- Note: If the Calendar Display View Type is selected, the preview option displays the records in a list - the actual view displays the data in a calendar format
- [Previous] - move backward to the previous tab
- [Next] - move forward to the next tab
- [Save] - save the View
- [Save As] - save the View with a new name (make a copy of the view with a new name)
- [Cancel] - stop the action and go back to the original View page}}
Other available options depend on the kind of View you're working with. For example:
- In the Color Code tab, you can conditionally color-code rows based on field criteria.
(Not avaialable for Thumbnail and Calendar views.) - In the Summary tab, you can select options to create computations on numeric fields.
(This tab only appears if the numeric values are visible in the View, and the view allows totals to be calculated.)
- In the Color Code tab, you can conditionally color-code rows based on field criteria.
Finally, each View has tabs that provide settings that are unique to that view. (The tabs are explained below.)
List Display
In a List Display, records are displayed as rows and columns in a table.
- The List Display Type is selected from the Fields tab when creating or editing a View
- Learn More: View Options
- The List Display offers the following options to customize the view: Fields, Order, Filter, Color Code
Tree Display
In a Tree Display, a navigation sidebar displayed, which presents groups of records. Choose a folder in the sidebar to display groups of records as rows and columns in a table.
- In the Group tab (available only for a #Tree_Display), select up to three levels of grouping.
- The Tree Display Type is selected from the Fields tab when creating or editing a View
- Learn More: View Options
- The Tree Display offers the following options to customize the view: Fields, Order, Filter, Color Code, Group and Summary tabs
Thumbnail Display
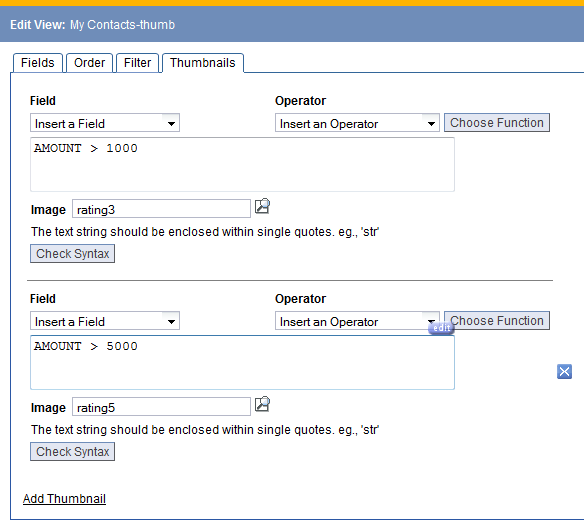
In the Thumbnail Display, a thumbnail icon is displayed for each record. Thumbnail images can be associated with user-defined criteria (for example, to display an icon that indicates some status condition).
- The Thumbnail Display Type is selected from the Fields tab when creating or editing a View
- Learn More: View Options
- The Thumbnail Display has several tabs:
- Fields - Choose which fields to display
- Order - Choose the order in which the fields are shown, as well as the order in which records are sorted.
- Filter - Specify filter criteria to determine which records are shown.
- Thumbnail - Specify the criteria that determines which thumbnail image is displayed
- Thumbnail images are selected from the image available in the Documents object
- If no image is specified, the default thumbnail image is displayed (file folder icon)
- The Thumbnail Display has several tabs:
Example criteria settings for a Thumbnail Display:
Calendar Display
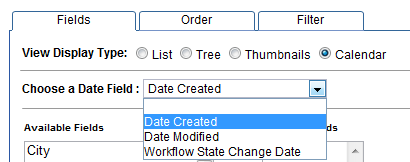
In the Calendar Display, records are presented in a calendar, based on a selected date field. A typical use is in an Events Management application, to show deadlines or other critical dates in a calendar view.
- The Calendar Display Type is selected from the Fields tab when creating or editing a View
- Learn More: View Options
- The Record Identifier Fields are displayed in the calendar, along with the timestamp of the selected date field
- To change the information that is displayed in the calendar, modify the Record Identifier Fields in Record_Locators
- Note: The Record Identifier Fields are displayed in the heading bar of each record, so if these values are changed, it will be reflected throughout the platform
- The Calendar Display offers the following options to customize the view: Fields, Order, Filter.
Clone a View
Filter this View
Note: This filter is not saved with the view
For details on how to include a filter in a View and save it for future use, see Filters.
- Example
- Find all Accounts who are NOT on the Do Not Call list
To filter the current View:
- Click the Wrench icon File:WrenchIcon.jpg
- Select the Filter this View option to create an ad hoc filter in the current View
- The following parameters are available to configure the search filter. You can use them in any combination:
- Search My Records Only
- Click this checkbox to limit your search to the records you own
- Search within Selected View Only
- Click this checkbox to limit the search to records in the current view
- (Optional) Account No
- Enter an Account Number to search for a specific account number. This field appears only when filtering the Accounts object
- Field | Operator | Value
- Learn more: Complex Expressions
Delete this View
You can delete any standard or custom views that you have created.
- Click the object tab associated with the view you want to delete. The main page for that tab opens.
- In the View list, select the name of the view you want to delete. The view you selected becomes the current view.
- In the View list, select Delete View. A message appears, asking you to confirm the deletion of this layout.
- Click OK. The view is deleted from the View list.
Views, Reports and Object Inheritance
When creating Views or Reports in objects that are part of an Object Inheritance model, it is important to consider the following:
- A Report or View that has no Filters will return all records from the designated object, including records from all parent object(s) in the hierarchy (following the path up to the root level).
To restrict the View or Report to only the desired objects, include the Object Name field in the Selected Fields list, and create a Filter on Object Name field to select only the objects of interest. [[Category:Template:Features]]


