Pass Through Authentication
Pass Through Authentication (PTA) lets a user go straight to the platform from an organization's web page or application, without having to log in again.
Working with pass through authentication
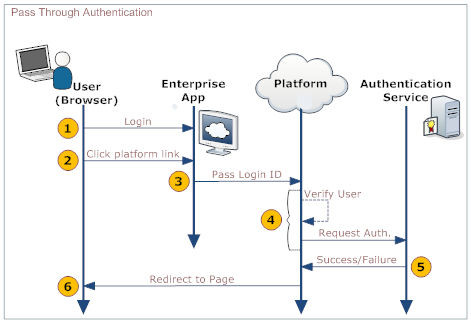
After logging on to an enterprise application, you might want to visit a page hosted on the platform without logging on to that platform. A single log on to the enterprise application gives you access to all the pages hosted on the platform. The application sends a SOAP message to the platform in an HTTP request. That SOAP message contains the information needed to log on to the platform. The data in it is passed to an authentication server which sends back a message saying whether the authentication has succeeded or failed. The user is directed to the appropriate page, as displayed in the following diagram:
Here is an explanation of the steps:
User Your organization's web application Platform Authentication server 1. Log on to a web page or application provided of your organization 2. Click a link that directs to a platform page 3. Pass data to the platform's PTA service in the SOAP payload - Session ID (optional, but desirable)
- Login ID
4. - Receive data in the SOAP payload:
- Pass data to the Authentication server
5. - Authenticate the user
- Send back a success-report or failure-report
6. Redirect the user to the appropriate page.
Enabling Pass Through Authentication
The URL of the Authentication Server and the URLs of the pages to visit in the event of success or failure are configured in the platform's Single Sign-On Settings:
- Click
 > Administration > Account Management > Single Sign-On Settings.
 - Click the [Edit] button.
- Choose Pass Through Authentication from the Single Sign-On Using drop-down list. Selecting Pass Through Authentication automatically displays the Platform Authentication Service URL field below the drop-down list.
- Specify the location of the authentication service in the ‘’’Third party Authentication Service URL’’’ field. The platform uses this URL to authenticate the USER and pass the appropriate pay load in the HTTP request.
- Enter the URL of the page where you want to go when the authentication succeeds in the “Success page URL” field.
- If the URL is not specified then the platform will take you to the home page.
- Enter the URL of the page where you want to go when the authentication fails in the “Error page URL” field.
- If the URL is not specified then the platform will take you to the login page.
- This field can be overridden dynamically by the Authentication Server
- Click [Save]
Message Formats
Posting a Form to the Platform
The following is an example of a form which the application or web page uses to make an HTTP POST to the platform. The user is then seamlessly redirected to the success or failure page depending on the authentication.
- <syntaxhighlight lang="xml" enclose="div">
<form id='testForm'
  action='https://{yourDomain}/networking/passThroughAuth'
  METHOD="POST" enctype="application/x-www-form-urlencoded"
>
  <input type="hidden" name="loginID" value="jondoe@test.com">
  <input type="hidden" name="sessionID" value="adasd3qw4q4weasdasd">
</form> </syntaxhighlight>
where:
- loginID
- The user's login name on the platform, typically in the form of an email address.
- sessionID
- The session ID of the user on the organization's website. This field is optional. It is passed on to the authentication service, so the authentication service can make use of it.
When the platform receives POSTed form data, it passes the data to the Authentication Service using content type application/x-www-form-urlencoded, in a request. See the example below:
- Method
- POST
- URI
- Configured in the Single Sign-On Settings
- Content-Type
- application/x-www-form-urlencoded
- Payload
- A URL Encoded version of a data string that looks like this:
- <syntaxhighlight lang="text" enclose="div">
loginID=jondoe@test.com&sessionID=adasd3qw4q4weasdasd </syntaxhighlight>
- The Authentication Service reads the identification parameters from the request as it is in this Java code, for example:
- <syntaxhighlight lang="java" enclose="div">
String loginId = (String)request.getParameter("loginID"); String sessionId = (String)request.getParameter("sessionID"); </syntaxhighlight>
- where:
- request is the object containing the HTTP request (for example, in an HttpServlet instance).
Sending a SOAP Request to the Platform
This message format can be delivered to the platform by an application or web page.
- Method
- POST
- URI
- https://{yourDomain}/networking/passThroughAuth
- <syntaxhighlight lang="xml" enclose="div">
<?xml version="1.0" encoding="UTF-8" ?> <soapenv:Envelope xmlns:soapenv="http://schemas.xmlsoap.org/soap/envelope/">
   <soapenv:Body>
       <LJAuthenticate xmlns="urn:authentication.soap.ws.longjump.com">
           <sessionID>...</sessionID>
           <loginID>...</loginID>
       </LJAuthenticate>
   </soapenv:Body>
</soapenv:Envelope> </syntaxhighlight>
where:
- sessionID
- The session ID of the user on the organization's website. Optional. It is passed on to the authentication service, so the authentication service can make use of it.
- loginID
- The user's login name on the platform--typically in the form of an email address.
When the platform receives a SOAP request, it sends a message in the following format to the Authentication Server:
- Method
- POST
- URI
- Configured in the Single Sign-On Settings
- <syntaxhighlight lang="xml" enclose="div">
<?xml version="1.0" encoding="UTF-8" ?> <soapenv:Envelope xmlns:soapenv="http://schemas.xmlsoap.org/soap/envelope/">
   <soapenv:Body>
       <LJAuthenticate xmlns="urn:authentication.soap.ws.longjump.com">
           <sessionID>...</sessionID>
           <originatingDomain>...</originatingDomain>
           <originatingIp>...</originatingIp>
           <loginID>...</loginID>
       </LJAuthenticate>
   </soapenv:Body>
</soapenv:Envelope> </syntaxhighlight>
- where:
- originatingDomain
- Name of the Domain the request originally came from (e.g. wwww.paaspartout.com)
- originatingIp
- IP Address of the domain the request originally came from (e.g. 10.20.30.40)
- sessionID
- Passed on from the original request
- loginID
- Passed on from the original request
Messages Returned by the Authentication Server
After authenticating the user, the server sends back a success or failure response.
- Authentication-Succeeded response
- This response is sent when authentication succeeds.
- <syntaxhighlight lang="xml" enclose="div">
<?xml version="1.0" encoding="UTF-8" ?> <soapenv:Envelope xmlns:soapenv="http://schemas.xmlsoap.org/soap/envelope/">
   <soapenv:Body>
       <LJAuthenticateResponse xmlns="urn:authentication.soap.ws.longjump.com">
           <status>AUTHENTICATED</status>
           <loginID>userLogin@Login.com</loginID>
       </LJAuthenticateResponse>
   </soapenv:Body>
</soapenv:Envelope> </syntaxhighlight>
- Authentication-Failed response
- This response is sent when authentication fails.
- <syntaxhighlight lang="xml" enclose="div">
<?xml version="1.0" encoding="UTF-8" ?> <soapenv:Envelope xmlns:soapenv="http://schemas.xmlsoap.org/soap/envelope/">
   <soapenv:Body>
       <LJAuthenticateResponse xmlns="urn:authentication.soap.ws.longjump.com">
           <status>NOT_AUTHETICATED</status>
           <loginID>userLogin@Login.com</loginID>
           <redirectOnErrorURL>http://www.location.com/somePage</redirectOnErrorURL>
       </LJAuthenticateResponse>
   </soapenv:Body>
</soapenv:Envelope> </syntaxhighlight>
- where:
- redirectOnErrorURL
- URL of the next page the user sees. (Overrides the Single Sign-On settings.)
