Difference between revisions of "Private Notes and Email Messages"
From AgileApps Support Wiki
imported>Aeric |
imported>Aeric |
||
| Line 13: | Line 13: | ||
#:* '''Search Knowledge Base -''' If a [[Knowledge Base]] is present, use this option to insert a link to an article. | #:* '''Search Knowledge Base -''' If a [[Knowledge Base]] is present, use this option to insert a link to an article. | ||
#: | #: | ||
# For all other records, including | # For all other records, including case records in other Dynamic Case Management applications, this form appears: | ||
#:[[File:EmailFormNormal.png]] | #:[[File:EmailFormNormal.png]] | ||
#:* '''Email Template -''' Select an optional [[Email Template]] to use for the message. | #:* '''Email Template -''' Select an optional [[Email Template]] to use for the message. | ||
Revision as of 00:38, 3 July 2013
About Private Notes and Email Messages
Private Notes and Email messages can be created when viewing a a Case record or some other record. They are stored in the record history, displayed underneath the record.
Working with Private Notes and Email Messages
Creating a Private Note or Email Message
- Under the record information, click in the area that says Reply or Add a Note
The area expands, and several additional buttons appear. - Click [Private Note] to add an entry to the record history
- Or click [Email] and select message recipients.
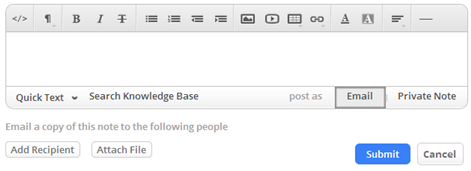
The message is added to the record history, the same as a note. - For a Case record in ServiceDesk, the following form appears:

- Quick Text - Insert a segment of Quick Text into the message.
- Search Knowledge Base - If a Knowledge Base is present, use this option to insert a link to an article.
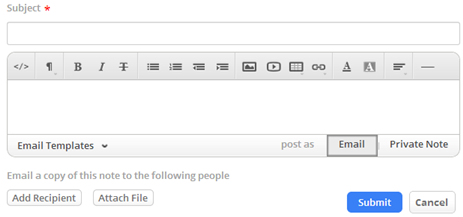
- For all other records, including case records in other Dynamic Case Management applications, this form appears:

- Email Template - Select an optional Email Template to use for the message.
- For all records, you can also:
- [Add Recipient] - Click this button to add additional message recipients for an email.
- [Attach File] - Click this button to add an Attachment.
- Click [Submit]