Difference between revisions of "Elements Sidebar"
From AgileApps Support Wiki
imported>Aeric m (Text replace - 'Designer > Data >' to 'Designer >') |
imported>Aeric |
||
| Line 2: | Line 2: | ||
{{permissions|Customize Objects|use the Elements Sidebar}} | {{permissions|Customize Objects|use the Elements Sidebar}} | ||
====About Display Labels==== | ====About Display Labels==== | ||
| Line 55: | Line 21: | ||
#:[[File:changefieldproperties.gif|none|thumb|Options will change depending on the type of field selected]] | #:[[File:changefieldproperties.gif|none|thumb|Options will change depending on the type of field selected]] | ||
#Click '''[Save]''' | #Click '''[Save]''' | ||
=====Display Attributes===== | =====Display Attributes===== | ||
{{:Display Attributes}} | {{:Display Attributes}} | ||
Revision as of 19:13, 21 August 2012
Use the Elements Sidebar to arrange and position fields in sections of a Form.
Users that have the Customize Objects permission can use the Elements Sidebar
About Display Labels
- The Display Labels option provides the ability to create custom labels for fields in a Form.
- In data entry tasks, the Form defines the appearance and behaviors of the page. Use the Clone a Form option to create custom data entry forms for different data entry tasks.
- Considerations
- Display Labels appear only in data entry forms (New Record or Edit a Record)
- Display Labels are configured for an Object, in a specific Form
- Display Labels are not visible in Views or Reports
- Display Labels are not available in Subforms
- When a Form is cloned, the Display Labels are copied to the new data entry form
Edit Field Properties
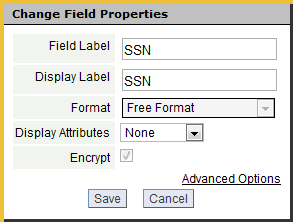
- In the Forms tab, hover the mouse anywhere over the field, and click the Edit Field
 button in the floating toolbar
- In the Change Field Properties dialog box, change any of the available parameters for this field
- Click [Save]
Display Attributes
- Choose Display Attributes from the following options:
- None
- No display attributes are specified (the field is displayed in records, and can be edited)
- Read-Only Field
- Read-Only fields are displayed in records, but cannot be edited. Read-Only fields can be defined from the Fields tab in Objects, or they can be Lookup-Derived Fields. To change the attributes of a field, see the Display Attributes section in Edit Field Properties.
- Required Field
- Required fields are highlighted to indicate that data input is required. If a Required field is empty when you click [Save], an Error Message is displayed.
- Considerations
-
- Checkbox fields are never Required
- Hidden Field
Hidden fields are used to maintain data associated with a record, but restrict visibility in the UI. Hidden fields are often used by Developers in the Developer Suite, to facilitate Javascript and formscript operations which can be used to manipulate, set, or update field values.
To change the attributes of a field, see the Display Attributes section in Edit Field Properties.


