Difference between revisions of "Picklist"
From AgileApps Support Wiki
imported>Aeric |
imported>Aeric |
||
| Line 17: | Line 17: | ||
#:'''Always Required -''' A selection must be made when adding or updating a record. | #:'''Always Required -''' A selection must be made when adding or updating a record. | ||
#:'''Field Name -''' Automatically created by the system (but you can change it here) | #:'''Field Name -''' Automatically created by the system (but you can change it here) | ||
#In the Role Based Permission Control section, select a [[Role Based Permission Control]] for each of the roles in the list | #: | ||
#In the Description Information section, include a description of the field and it's use. This information is only visible to users with rights to customize this field. | #In the ''Display Attributes'' section, show where the field is displayed in the default form, and whether or not a selection is required when adding or updating a record. | ||
#: | |||
#In the ''Default Value'' section, specify the default value. (In general, the default value will be a simple String. For example: 'rush'.) | |||
#: | |||
#In the ''Role Based Permission Control'' section, select a [[Role Based Permission Control]] for each of the roles in the list | |||
#: | |||
#In the ''Description Information'' section, include a description of the field and it's use. This information is only visible to users with rights to customize this field. | |||
#Click '''[Save]'''<br/>The field is added, and the field-definition is shown. | #Click '''[Save]'''<br/>The field is added, and the field-definition is shown. | ||
| Line 24: | Line 30: | ||
#Click '''[Add Value]''' button to add a new item to the Pick List. | #Click '''[Add Value]''' button to add a new item to the Pick List. | ||
#Click '''[Reorder Values]''' to change the order in which they appear. | #Click '''[Reorder Values]''' to change the order in which they appear. | ||
#Click '''[Manage Values]''' to specify display text, color, styles, and images, along with returned values. | |||
==Example Picklists== | ==Example Picklists== | ||
Revision as of 20:38, 23 January 2012
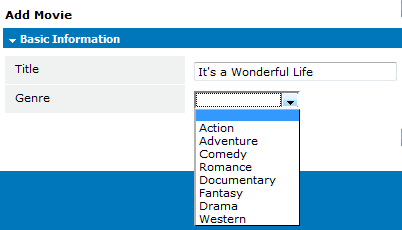
A picklist is a type of field that can contain a list of values. A picklist appears as a drop-down list of values when using a Form to add a record to an object.
Users that have the Customize Objects permission can add, edit or delete picklists
- Compare to Global Picklist and Dependent Picklist
Create a Picklist
- Click Designer > Data > Objects > {object} > Fields
- Click [New Field]
- In the Basic Information section, specify the basic characteristics of the field:
- Label - The text that appears as the field name
- Display Type - Picklist
- Picklist Values - For a simple Picklist that displays the same values it returns with no colors or other styling, enter the values here. Otherwise, wait until the Picklist has been created, then choose #Manage Values to specify display text, colors, and images, along with the value returned for each selection.
- Use First Value as Default - Otherwise, the field is intially empty.
- Sort List Alphabetically - Otherwise, you manually arrange the order.
- Always Required - A selection must be made when adding or updating a record.
- Field Name - Automatically created by the system (but you can change it here)
- In the Display Attributes section, show where the field is displayed in the default form, and whether or not a selection is required when adding or updating a record.
- In the Default Value section, specify the default value. (In general, the default value will be a simple String. For example: 'rush'.)
- In the Role Based Permission Control section, select a Role Based Permission Control for each of the roles in the list
- In the Description Information section, include a description of the field and it's use. This information is only visible to users with rights to customize this field.
- Click [Save]
The field is added, and the field-definition is shown.
Then, at the bottom of the field-definition page:
- Click [Add Value] button to add a new item to the Pick List.
- Click [Reorder Values] to change the order in which they appear.
- Click [Manage Values] to specify display text, color, styles, and images, along with returned values.
Example Picklists
- Agreement
- Yes / No
- Inspection
- Passed / Did not pass
- Survey Responses
- Very Satisfied / Somewhat Satisfied / Satisfied / Not Satisfied / Not Applicable
- List of Items
- Fruit / Vegetable / Neither
- Genres
- Action / Adventure / Comedy / Romance / Documentary / Fantasy / Drama / Western
- T-Shirt Size
- Extra Small / Small / Medium / Large / Extra Large
