Difference between revisions of "Part 2: Implement Rule Sets"
From AgileApps Support Wiki
Wikieditor (talk | contribs) (Created page with "In this part, you implement the Rule Sets that you created in Exercise 5. # On the Business Rules page, select '''Rule Sets''': #: You should see the two (empty) Rule Sets tha...") |
Wikieditor (talk | contribs) |
||
| (2 intermediate revisions by the same user not shown) | |||
| Line 1: | Line 1: | ||
In this part, you implement the Rule Sets that you created in Exercise 5. | In this part, you implement the Rule Sets that you created in Exercise 5. | ||
# On the Business Rules page, select '''Rule Sets''': | # On the Business Rules page, select '''Rule Sets''':<br><br>[[File:Objects_Orders_Business_Rules_Rule_Sets.png|500px]]<br><br> | ||
#: You should see the two (empty) Rule Sets that you created in exercise 5 when you added '''Execute Rule Set''' steps to the '''Process Model''': | #: You should see the two (empty) Rule Sets that you created in exercise 5 when you added '''Execute Rule Set''' steps to the '''Process Model''': | ||
## '''Complete Order''' | ## '''Complete Order''' | ||
## '''Update Pending''' | ## '''Update Pending''' | ||
# As both empty Rule Sets have been added by the process model editor, they are still disabled. | # As both empty Rule Sets have been added by the process model editor, they are still disabled.<br><br>[[File:RuleSets SouthEastOrders.PNG|800px|]]<br><br> | ||
#: Edit both Rule Sets and '''enable''' each. | #: Edit both Rule Sets and '''enable''' each. | ||
# To update Rule Set '''Complete Order''': | # To update Rule Set '''Complete Order''': | ||
## Edit Rule Set '''Complete Order''' and click '''New Rule'''. | ## Edit Rule Set '''Complete Order''' and click '''New Rule'''. | ||
## Create a new unconditional Rule called '''Close Order''' that sets the Order '''Status''' to '''Closed''': | ## Create a new unconditional Rule called '''Close Order''' that sets the Order '''Status''' to '''Closed''':<br><br>[[File:New_Rule_Close_Order.png|800px]]<br><br> | ||
## Click '''Save'''. | ## Click '''Save'''. | ||
# To update Rule set '''Update Pending''': | # To update Rule set '''Update Pending''': | ||
## Edit the Rule Set '''Update Pending''' and click '''New Rule'''. | ## Edit the Rule Set '''Update Pending''' and click '''New Rule'''. | ||
## Create a new unconditional Rule called '''Pending Status''' that sets the Order '''Status''' to '''Pending''': | ## Create a new unconditional Rule called '''Pending Status''' that sets the Order '''Status''' to '''Pending''':<br><br>[[File:New_Rule_Pending_Status.png|800px]]<br><br> | ||
## Click '''Save'''. | ## Click '''Save'''. | ||
------------------------------------------------------------------------------------------------------------------------------------------------------------------------------------------------------------------------------------------------------------------------ | |||
:{| border="0" align="left" cellpadding="5" cellspacing="1" | |||
| | |||
[[Part 1: Create an Event Rule|Previous]] | |||
|} | |||
:{| border="0" align="right" cellpadding="5" cellspacing="1" | |||
| | |||
[[Part 3: Test the Rules and the Process Model|Next]] | |||
|} | |||
Latest revision as of 11:00, 14 December 2022
In this part, you implement the Rule Sets that you created in Exercise 5.
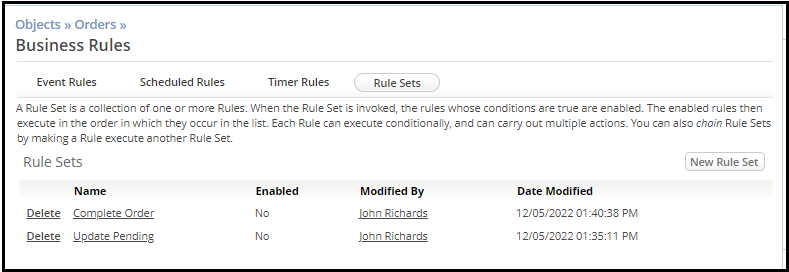
- On the Business Rules page, select Rule Sets:

- You should see the two (empty) Rule Sets that you created in exercise 5 when you added Execute Rule Set steps to the Process Model:
- Complete Order
- Update Pending
- As both empty Rule Sets have been added by the process model editor, they are still disabled.
- Edit both Rule Sets and enable each.
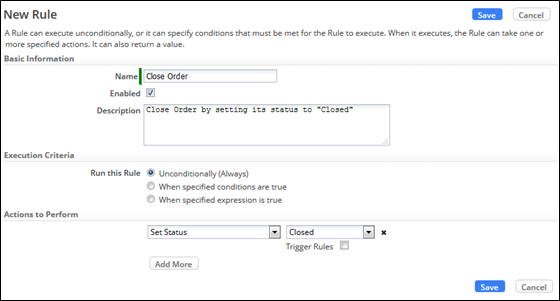
- To update Rule Set Complete Order:
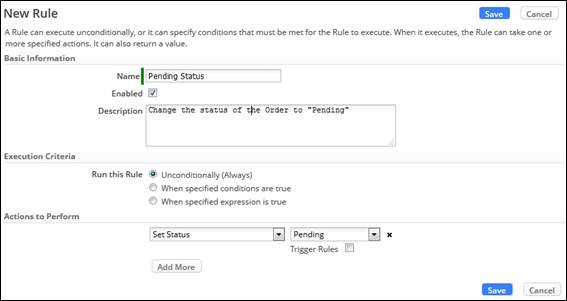
- To update Rule set Update Pending:


