Difference between revisions of "List Views"
imported>Aeric (Redirected page to Views) |
Wikieditor (talk | contribs) |
||
| (33 intermediate revisions by 2 users not shown) | |||
| Line 1: | Line 1: | ||
# | A ''List View'' displays a list of records. You can get to a List View by clicking any tab in your application. | ||
__TOC__ | |||
===About List Views=== | |||
{{:About the List View}} | |||
===Working with List Views=== | |||
====Sorting a List View==== | |||
:List Views can be sorted by clicking on a column heading. You can then choose between an Ascending and Descending sort. | |||
====Viewing and Editing Records==== | |||
:Click an entry in the list to visit the record. | |||
{{Note|<br>The navigation in the new runtime user interface is simplified by removing the legacy return to list functionality. The user can now directly use the browser back button to navigate between pages.}} | |||
:*''Column'' can be resized. 64px is the minimum length and there is no maximum limit. | |||
:*In the record view, numeric fields such as number, decimal, currency and percentage are aligned to the right side of the column with decimal points to identify the rank or position of the numbers. For instance, Unit, Tens. | |||
:*Click on any row to view the respective ''Record'' detail. | |||
====Searching a List View==== | |||
:At the top of the window, type text into the search field and press Enter or click the Magnifier icon [[File:MagnifierIcon.png]] to select records whose contents contain the value you specify. Optionally, click the down arrow at the end of the box to specify which objects to search. | |||
::[[File:SearchBar.png]] | |||
====Multi Record Actions==== | |||
{{:Multi Record Actions}} | |||
====Using the Alphabetic Index==== | |||
:Some views contain an alphabetic index at the top of the page, to help you find the record(s) you're interested in: | |||
::[[File:AlphabeticIndex.png]] | |||
:If there is sidebar that lets you customize the current view and/or create your own views, that index generally does ''not'' appear. (It appears in administrative views that don't have those capabilities, in views where it is considered essential.) | |||
===Deleting a View=== | |||
To delete a view: | |||
:1. Go to '''Settings''' > '''Access Management''' > '''Manage Views and Reports'''. | |||
:2. From the Views and Reports page, select the view you want to delete and click the delete option as shown in the following example: | |||
::[[File:delete_view.png]] | |||
:3. In the confirmation window, click '''Ok'''. The view is deleted and goes into the Recycle Bin. Ensure to clear this from the recycle bin to delete this view permanently from the system. For more information, see [[Working with the Recycle Bin]]. | |||
===Customizing a List View=== | |||
When the sidebar presents you with a list of views, you can customize the current view, in addition to making new ones. You can choose the columns that are displayed in the list, and the order in which they appear. You can make different views that are available to users in different roles. | |||
'''To customize a view:''' | |||
# Click the down arrow ([[File:DownArrowIcon.png]]) next to the name of the currently selected view.<br>A popup appears with view options: | |||
#:[[File:ViewOptionsDialog.png]] | |||
# Click '''Edit'''.<br>The view edit-window appears: | |||
#:[[File:ViewEditDialog.png]] | |||
#In the first tab, select the '''Fields''' to display. | |||
#:'''Note:''' <br> In new AgileApps UI, you can use the keyboard key Alt+arrow to arrange the fields and also move the fields from "Available Fields" to "Selected Fields". | |||
# Click '''New Formula''' to define a formula field that appears only in this view.<br>The [[Formula Builder]] appears. | |||
# In the next tab, specify the '''Order''' in which they should appear in the view. | |||
#: If a [[Multi-Object Lookup]] field is selected for sorting, an additional field appears that asks you to select the target-object for the Lookup. All records that target that object are included in the view, and they are sorted using the [[Record Locator]] values defined for that object. (For example, case number for the Cases object, first and last name for the Users object.) | |||
#:: '''Note:'''<br>In a sense, choosing a multi-object lookup field for sorting also acts as a filter--because any records that target other objects are not included in the view. (It would be difficult to sort records that pointed to different objects. For example, supposed that 3 records point to Apples, and another 3 point to Oranges. Suppose further that Apples are sorted by variety, and Oranges by size and color. A general solution that allows deterministic results would be complex to implement, computationally-intensive, and only rarely used.) | |||
#In the last tab, create a ''Filter'', to determine which records to include in the view. | |||
# Use the [[View Filter]] options to filter by record ownership, by date, or by field value. | |||
# Click '''[Preview]''' to see the modified view. | |||
# Click '''[Save]''' save it as the current view, or '''[Save As]''' to make a new view.<br>(Standard, built-in views cannot be modified. For them, Save makes a copy, as well as Save As. | |||
# While saving the view, you can give it a name and determine who can see it. | |||
#You can hide the ''Requestor'' and ''Case'' columns in the record view by unchecking the option '''Show standard fields in the record view''' in the Object properties. | |||
===Mass View Print=== | |||
{{:Mass View Print}} | |||
Latest revision as of 12:10, 1 August 2022
A List View displays a list of records. You can get to a List View by clicking any tab in your application.
About List Views
In a List View, records are displayed in a grid, like a spreadsheet. The tabs in your case management application display cases and tasks, for example. But list views are also used for objects, reports, and many other platform components.
Application tabs like Cases and Tasks have a sidebar that lets you customize the view and create new ones. Administrative views, on the other hand, use the available space to show as much information as possible. For many of those views, the alphabetic filtering option makes it easier to find the record(s) you're looking for.
Common operations provided by all views include:
- Click a column heading to sort the records on that column.
(The column icon changes to show that it has been sorted.) - Click again to reverse the sort.
- Type in a value and click the Magnifier icon
 to search for a record with that value. Click the down arrow to get a list of things you've searched on before.
- Click a column heading to sort the records on that column.
Working with List Views
Sorting a List View
- List Views can be sorted by clicking on a column heading. You can then choose between an Ascending and Descending sort.
Viewing and Editing Records
- Click an entry in the list to visit the record.
- Column can be resized. 64px is the minimum length and there is no maximum limit.
- In the record view, numeric fields such as number, decimal, currency and percentage are aligned to the right side of the column with decimal points to identify the rank or position of the numbers. For instance, Unit, Tens.
- Click on any row to view the respective Record detail.
Searching a List View
- At the top of the window, type text into the search field and press Enter or click the Magnifier icon
 to select records whose contents contain the value you specify. Optionally, click the down arrow at the end of the box to specify which objects to search.
Multi Record Actions
These actions let you assign or claim ownership of multiple records at one time.
They are available in the Cases object and the Tasks Object.
To change ownership of multiple records:
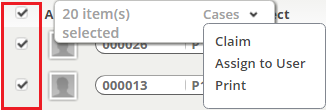
- In a View, click Checkbox(es) to select individual records
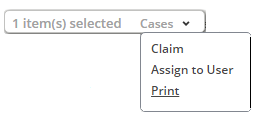
A pop-up appears showing the number of selected records and the object name. - Click the object name to display the list of additional actions, as shown here:
- Select one of the options.
- Claim - A confirmation dialog appears.
- Assign Owner - Choose the new owner.
- Click [Ok] to complete the action
To select all records in a view:
- Click the selection box at the top of the column
- The selection box changes from this:
 to this:
  for all records in the view.
To clear (uncheck) the checkboxes from all selected records:
- Click the selection box at the top of the column
- The selection box changes from this:
 to this:
  for all selected records.
Using the Alphabetic Index
- Some views contain an alphabetic index at the top of the page, to help you find the record(s) you're interested in:
- If there is sidebar that lets you customize the current view and/or create your own views, that index generally does not appear. (It appears in administrative views that don't have those capabilities, in views where it is considered essential.)
Deleting a View
To delete a view:
- 1. Go to Settings > Access Management > Manage Views and Reports.
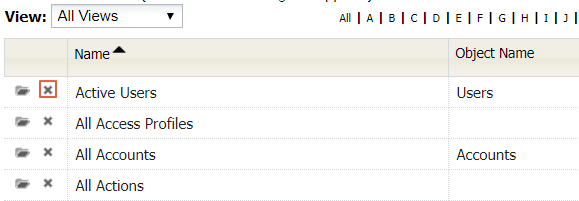
- 2. From the Views and Reports page, select the view you want to delete and click the delete option as shown in the following example:
- 3. In the confirmation window, click Ok. The view is deleted and goes into the Recycle Bin. Ensure to clear this from the recycle bin to delete this view permanently from the system. For more information, see Working with the Recycle Bin.
Customizing a List View
When the sidebar presents you with a list of views, you can customize the current view, in addition to making new ones. You can choose the columns that are displayed in the list, and the order in which they appear. You can make different views that are available to users in different roles.
To customize a view:
- Click the down arrow (
 ) next to the name of the currently selected view.
A popup appears with view options: - Click Edit.
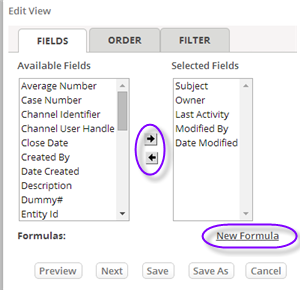
The view edit-window appears: - In the first tab, select the Fields to display.
- Note:
In new AgileApps UI, you can use the keyboard key Alt+arrow to arrange the fields and also move the fields from "Available Fields" to "Selected Fields".
- Note:
- Click New Formula to define a formula field that appears only in this view.
The Formula Builder appears. - In the next tab, specify the Order in which they should appear in the view.
- If a Multi-Object Lookup field is selected for sorting, an additional field appears that asks you to select the target-object for the Lookup. All records that target that object are included in the view, and they are sorted using the Record Locator values defined for that object. (For example, case number for the Cases object, first and last name for the Users object.)
- Note:
In a sense, choosing a multi-object lookup field for sorting also acts as a filter--because any records that target other objects are not included in the view. (It would be difficult to sort records that pointed to different objects. For example, supposed that 3 records point to Apples, and another 3 point to Oranges. Suppose further that Apples are sorted by variety, and Oranges by size and color. A general solution that allows deterministic results would be complex to implement, computationally-intensive, and only rarely used.)
- Note:
- If a Multi-Object Lookup field is selected for sorting, an additional field appears that asks you to select the target-object for the Lookup. All records that target that object are included in the view, and they are sorted using the Record Locator values defined for that object. (For example, case number for the Cases object, first and last name for the Users object.)
- In the last tab, create a Filter, to determine which records to include in the view.
- Use the View Filter options to filter by record ownership, by date, or by field value.
- Click [Preview] to see the modified view.
- Click [Save] save it as the current view, or [Save As] to make a new view.
(Standard, built-in views cannot be modified. For them, Save makes a copy, as well as Save As. - While saving the view, you can give it a name and determine who can see it.
- You can hide the Requestor and Case columns in the record view by unchecking the option Show standard fields in the record view in the Object properties.
Mass View Print
Mass View Print
This feature allows you to print multiple record details of the object. Mass View Print feature consists of two functionalities:
- Mass Print on Selected Record – This functionality is available only for CASES object.
- Mass Print on Views – This functionality is available only for CASES, TASKS, ACCOUNTS, CONTACTS and other custom objects.
Mass Print on Selected Record
Mass Print on Selected Record functionality allows you to select multiple records from CASES object and print the selected records. If the selected records are less than or equal to 25, then the AgileApps platform processes the request and generates a document. If the selected records are more than 25, then the AgileApps platform displays a validation message "The maximum number of selected records should not exceed 25" and does not generate the document.
To print records:
- Under CASES tab, select the checkbox to mark records for print. If "Print using Views and Reports" checkbox is selected in the Access Profiles, then the Print option is available in the Cases drop-down of the pop-up. The pop-up is displayed after selecting the record checkbox. If "Print using Views and Reports" checkbox is not selected in the Access Profiles, then the Print option is not available in the Cases drop-down of the pop-up. The pop-up is displayed after selecting the record checkbox.
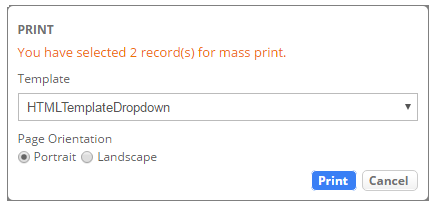
- 2. Click Print. PRINT dialog box pops up.
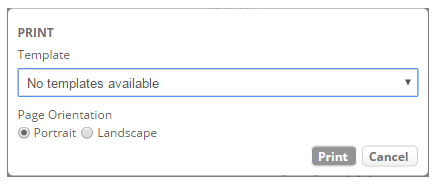
- Select a Template from the Template drop-down. For more information on Documentation Templates, see Add a Document Template.
- 2. Set Page Orientation.
- 3. Click Print.
Mass Print on Views
Mass Print on Views functionality is available to you only when "Print using Views and Reports" checkbox is selected in the user's Access Profiles. If "Print using Views and Reports" checkbox is not selected in the user’s Access Profiles, then the Print option is not available in the drop-down. This drop-down is available against the name in the Views column that is available as a sidebar. Also, HTML option under EXPORT drop-down is unavailable.
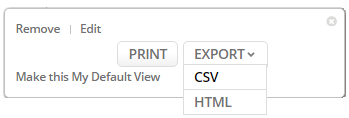
HTML printing option and CSV format option is now available under Export option. HTML option currently available under Export option was previously available as Print. CSV format currently under Export option was previously available as Export. The new Print button shown in the image below is for the new feature - Mass Print on Views.
If the selected View contains records less than or equal to 25, AgileApps platform processes the request and generates the document immediately.
If the selected View contains records more than 25 and less than or equal to 100 records, AgileApps platform processes the request offline and completes the Mass Print. User is notified by email and contains a link for downloading the document.
If the selected View contains records more than 100, AgileApps platform processes the request offline and completes the Mass Print for first 100 records. User is notified by email and contains a link for downloading the document.
If the Mass Print operation is performed on a Parent View and the Parent View contains a child object record, then the child object record is printed against parent object ID.
To Print the Views:
- Under Views column available to the right as sidebar, click the down arrow
 against the name of the view.
- 2. Click Print. PRINT dialog box pops up.
- Select a Template from the Template drop-down. For more information on Documentation Templates, see Add a Document Template.
- 2. Set Page Orientation.
- 3. Click Print.
