Difference between revisions of "Default Value"
imported>Evelyn |
imported>Aeric |
||
| (7 intermediate revisions by the same user not shown) | |||
| Line 2: | Line 2: | ||
Default field values can be used to support these actions: | Default field values can be used to support these actions: | ||
*Include a date/time stamp in a reservation record | :*Include a date/time stamp in a reservation record | ||
:(use a timestamp to manage first-come, first-served request processing) | ::(use a timestamp to manage first-come, first-served request processing) | ||
*Append a code prefix to a field value | :*Append a code prefix to a field value | ||
:(create a code based on the request type or the originating territory/zip code/state - the code can be used in | ::(create a code based on the request type or the originating territory/zip code/state - the code can be used in decision-making) | ||
*Automatically set the default fulfillment date for orders to be 'x' days from today | :*Automatically set the default fulfillment date for orders to be 'x' days from today | ||
:(use the future fulfillment date to manage work) | ::(use the future fulfillment date to manage work) | ||
*Create [[#Dynamic Filters|Dynamic Filters]] as default field values | :*Create [[#Dynamic Filters|Dynamic Filters]] as default field values | ||
==How it Works== | ==How it Works== | ||
| Line 15: | Line 14: | ||
===New Record=== | ===New Record=== | ||
*When a new record is added from the browser interface (when a user edits a form), the default value automatically appears in the field. | :* When a new record is added from the browser interface (when a user edits a form), the default value automatically appears in the field. | ||
:* If the record is saved with the default value in place, the default value is saved with the record | |||
:* If the user changes field value, the new value overrides the default value and is saved with the record | |||
:* If the user changes field value to <BLANK>, it overrides the default value and is saved with the record | |||
===Existing Record=== | ===Existing Record=== | ||
*When an existing record is edited, the default value appears as it was when last saved. | :* When an existing record is edited, the default value appears as it was when last saved. | ||
:* If a default value was saved as <BLANK>, the default value automatically appears in the field | |||
===Limitations=== | ===Limitations=== | ||
Default values cannot be applied: | Default values cannot be applied: | ||
*to [[Web Forms]] | :*to [[Web Forms]] | ||
*during [[Data Import]] | :*during [[Data Import]] | ||
*for fields which are not in the [[Form | :*for fields which are not in the [[Forms|Form]] | ||
==Available Field Display Types== | ==Available Field Display Types== | ||
| Line 41: | Line 40: | ||
#:<tt>NOW()</tt> | #:<tt>NOW()</tt> | ||
#:[[Image:now-newfield.gif|none|thumb]] | #:[[Image:now-newfield.gif|none|thumb]] | ||
#Make any additional changes and [Save] | #Make any additional changes and '''[Save]''' | ||
#:A validation is performed to verify that the formula has the correct syntax | #:A validation is performed to verify that the formula has the correct syntax | ||
#:To perform this validation, click the [Check Syntax] button; An error message will appear if the syntax is not correct | #:To perform this validation, click the '''[Check Syntax]''' button; An error message will appear if the syntax is not correct | ||
#:When a new field is added, the Date Field you created will appear with an automatic timestamp: | #:When a new field is added, the Date Field you created will appear with an automatic timestamp: | ||
::[[Image:now.gif|none|thumb]] | ::[[Image:now.gif|none|thumb]] | ||
| Line 52: | Line 51: | ||
#:Add this expression in the Default Field area: | #:Add this expression in the Default Field area: | ||
#:<tt>DATEADD(TODAY(), 7)</tt> | #:<tt>DATEADD(TODAY(), 7)</tt> | ||
#Make any additional changes and [Save] | #Make any additional changes and '''[Save]''' | ||
#:A validation is performed to verify that the formula has the correct syntax | #:A validation is performed to verify that the formula has the correct syntax | ||
#:To perform this validation, click the [Check Syntax] button; An error message will appear if the syntax is not correct | #:To perform this validation, click the '''[Check Syntax]''' button; An error message will appear if the syntax is not correct | ||
:[[Image:Defaultfieldvalue.gif|none|thumb]] | :[[Image:Defaultfieldvalue.gif|none|thumb]] | ||
Latest revision as of 03:18, 12 January 2013
When default values are defined for a field, data entry tasks take less time, because fields are automatically populated with correct information.
Default field values can be used to support these actions:
- Include a date/time stamp in a reservation record
- (use a timestamp to manage first-come, first-served request processing)
- Append a code prefix to a field value
- (create a code based on the request type or the originating territory/zip code/state - the code can be used in decision-making)
- Automatically set the default fulfillment date for orders to be 'x' days from today
- (use the future fulfillment date to manage work)
- Create Dynamic Filters as default field values
How it Works
A Formula can be used to define a default value for a field. The formula is applied differently, depending on the situation - when a new record is added, or an existing record is edited.
New Record
- When a new record is added from the browser interface (when a user edits a form), the default value automatically appears in the field.
- If the record is saved with the default value in place, the default value is saved with the record
- If the user changes field value, the new value overrides the default value and is saved with the record
- If the user changes field value to <BLANK>, it overrides the default value and is saved with the record
Existing Record
- When an existing record is edited, the default value appears as it was when last saved.
- If a default value was saved as <BLANK>, the default value automatically appears in the field
Limitations
Default values cannot be applied:
- to Web Forms
- during Data Import
- for fields which are not in the Form
Available Field Display Types
For a list of available field display types, see: Field Display Types. A field can also default to an Expression based on Formula Functions, or can be built around a Dynamic Filter.
Add a Default Value to a Field
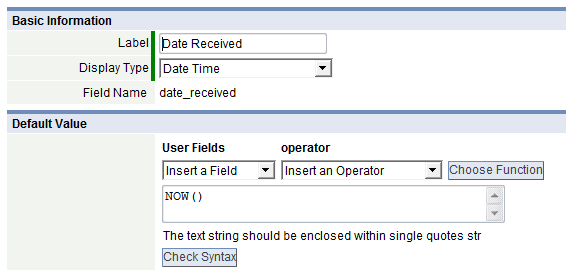
To set a Date Field to default as the current date:
- Add a new field
- Select Date Time as the Display Type:
- Add this expression in the Default Field area:
- NOW()
- Make any additional changes and [Save]
- A validation is performed to verify that the formula has the correct syntax
- To perform this validation, click the [Check Syntax] button; An error message will appear if the syntax is not correct
- When a new field is added, the Date Field you created will appear with an automatic timestamp:
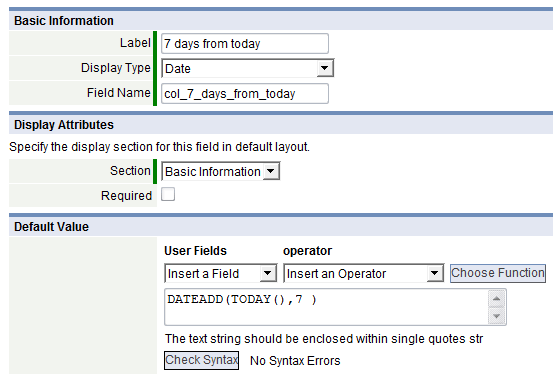
To set a Date Field to default as 7 days from today:
- Add a new field
- Select Date as the Display Type:
- Add this expression in the Default Field area:
- DATEADD(TODAY(), 7)
- Make any additional changes and [Save]
- A validation is performed to verify that the formula has the correct syntax
- To perform this validation, click the [Check Syntax] button; An error message will appear if the syntax is not correct
Examples
| Expression | Field Display Type | Description |
|---|---|---|
| if( user.firstname = 'Jim','A,B','C') | Multiple Check Boxes | Set the default checkbox value, based on an expression.
In this example, assume that the values in a multiple check box are A, B and C. This expression assigns the following checkbox values, based on whether the user first name is Jim: If the user.firstname field is equal to 'Jim', checkboxes A and B are checked If the user.firstname is not equal to 'Jim', box C is checked |
| DATEADD(TODAY(), 7) | Date | Set the field default to 7 days from today (next week) |
Dynamic Filters
Dynamic Filters define a query with field variables, enabling more powerful controls.
- Use Dynamic Filters when complex associations are needed for Record Selection Criteria
- How it Works
-
- In a Technology Asset record, display a list of Technicians certified to support or repair the equipment
- For an Inventory Application, add a field to a Part Record that finds only component parts (subcomponents of the Part)
- For a Product or Service Ordering Application, add a field to a Brand Record that limits the lookup to products that belong to the brand family
- In a Candy Manufacturing Application, add a field to a Recipe Record that identifies organic ingredients only
- Guidelines for building Dynamic Filters
- The format of a Dynamic Filter changes, depending on the type of field:
- Lookup
- Other (text, date, other alphanumeric field)
- Standard Filter Expression syntax can be used:
- Owner equals BLANK - Record that has no owner
- Status contains 1|2|3|4 - Picklist field contains one of the specified values
- A derived field name can also be specified in the Value field of the Record Selection Criteria builder
- To create a derived field name, include a dollar sign ($) before the internal field name (this identifies the value as a dynamic filter)
- If a Lookup field is chosen, use the format, $fieldname_name
- For all other fields, use $fieldname
- Learn more: Field Names
- Examples
-
- In a Lookup field of Object "Employee", to restrict the Employees available depending on the Location, set filter to {0} in the Location field. If the Location is any other field type, set filter to {1} in the Location field.
- An IT assets object is linked to the Service Techs object, which includes staff members who are responsible for support
- Service Techs have an Area of Responsibility that matches one of the available IT asset Types: "Laptop", "Desktop", or "Server"
- The Service Tech object is defined as follows:
- In the IT asset object, the Lookup field to the Service Tech object includes Record Selection Criteria that limits the lookup to Service Techs with Areas of Expertise that match the Asset Type:
- When assigning the asset to a user, a Service Tech is selected, and the list of Service Techs displayed in the Lookup Window shows only the techs with expertise in the required area of technology


