Difference between revisions of "Exercise 10: Using Packages for Deployment"
From AgileApps Support Wiki
Wikieditor (talk | contribs) (Created page with "==Objective== : In this exercise, you create a Package to back up your new Application and all the components that you have developed during this class.<br> : To do so, you wi...") |
Wikieditor (talk | contribs) |
||
| (8 intermediate revisions by the same user not shown) | |||
| Line 1: | Line 1: | ||
== | ==Introduction== | ||
===Deploying a webMethods AgileApps Application=== | |||
:* A webMethods AgileApps Cloud application can be deployed: | |||
:** On the AgileApps public PaaS (Platform-as-a-Service) cloud | |||
:*** Where you have been executing the course exercises within your own (trial) Tenant | |||
:** On-premise installation into an organization’s network environment | |||
:*** The tenancy structure is still possible | |||
:* To deploy an AgileApps Cloud application: | |||
# Publish a Package (a zip file) | |||
#:* The Package can contain an entire application, or parts of one | |||
#:* The Package contains the structure of the application, NOT the data | |||
# Make the Package available to others | |||
#:* Add the application to the “Marketplace”, where other Tenants can install it | |||
#:* Put the zip file on the Web or in an email | |||
===Application Deployment Scenario #1 (of 2)=== | |||
'''Publishing Application to "Subscriber" Tenants''' | |||
:* Applications can be shared with Subscribers (other Tenants) | |||
:* You publish, they install | |||
:* You update, they upgrade | |||
[[File:Application_Deployment_Scenario1.png|800px]] | |||
===Application Deplayment Scenario #2 (of 2)=== | |||
'''From "Dev" to "Test" to "Prod"''' | |||
:* In this scenario, each Tenant environment represents a different stage in the application development and deployment lifecycle | |||
:** New things are created in the development (“Dev”) environment | |||
:** The “Test” environment is used to ensure that everything continues to work as expected | |||
:** When fully tested, the application is rolled out to end-user’s production (“Prod”) environment | |||
:* Sandboxes are designed for that purpose | |||
:** Each “Sandbox” is a separate sub Tenant | |||
:*** '''Configuration''' > '''Administration''' > '''Account Management''' > '''Sandboxes''' | |||
:*** Sandboxes are not available by default - you request it from AgileApps Cloud support | |||
:** A Package is directly deployed (rather than waiting for optional subscribe/update) | |||
:** Distribution paths can be defined - so a development Tenant can deploy to the test environment, but cannot deploy directly to production | |||
===Packages=== | |||
:* '''Features''' | |||
:** Dependencies are automatically included | |||
:*** A Package always contains what it needs to run | |||
:** The packaging system was designed to allow a software provider to share an application with subscribers (scenario #1) | |||
:*** Other Tenants who have installed an earlier version of the Package | |||
:* '''Limitations''' | |||
:** The design did not take into account the need to publish from a development system to a test system, and from test to production (Scenario #2) | |||
:** Some things that need to be overwritten in that scenario are left intact, while some that should be left alone are overwritten. For example: | |||
:*** Email Templates and Team definitions are not overwritten | |||
:*** Web Services are overwritten (good, except for server targets and login details) | |||
:*** Global Template Variables are not included in a Package | |||
:* '''Compatibility between cloud and on-premise applications''' | |||
:** To install a Package created on the cloud, you must make sure that the on-premise installation version is the same version as the one on the could when the application Package is generated | |||
:* '''Learn More''': | |||
:** http://agileappscloud.info/aawiki/Package_Items | |||
:** http://agileappscloud.info/aawiki/Choosing_a_Deployment_Strategy_for_Development_Systems | |||
==Exercise== | |||
: In this exercise, you create a Package to back up your new Application and all the components that you have developed during this class.<br> | : In this exercise, you create a Package to back up your new Application and all the components that you have developed during this class.<br> | ||
: To do so, you will use the Packages component of “Account Management” to enable packaging, versioning, and promotion of collections of Objects through the application development lifecycle.<br> | : To do so, you will use the Packages component of “Account Management” to enable packaging, versioning, and promotion of collections of Objects through the application development lifecycle.<br> | ||
==Steps== | ===Steps=== | ||
# Navigate to '''Configuration''' > '''Administration''' > '''Account Management''' > '''Packages''' and click '''New Package'''. | # Navigate to '''Configuration''' > '''Administration''' > '''Account Management''' > '''Packages''' and click '''New Package'''. | ||
# Type a '''Name''' as '''<your_subdomain>MyOrdersApp''' and provide a '''Description''' as shown: | # Type a '''Name''' as '''<your_subdomain>MyOrdersApp''' and provide a '''Description''' as shown:<br><br>[[File:New_Package_ johnrichardsMyOrders_App.PNG|800px]]<br><br> | ||
# Click '''Save'''. | # Click '''Save'''. | ||
# Click '''Add Item'''. | # Click '''Add Item'''. | ||
# Choose '''Item Type''' as '''Application''' and check the box next to the '''MyOrders''' application. Click '''Add to Package'''. | # Choose '''Item Type''' as '''Application''' and check the box next to the '''MyOrders''' application. Click '''Add to Package'''.<br><br>[[File:Add_Item_to_Package_johnrichardsMyOrdersApp.PNG|900px]]<br><br> | ||
# Review the Objects that are part of the application: | # Review the Objects that are part of the application:<br><br>[[File:Package_johnrichardsMyOrders_App.PNG|900px]]<br><br> | ||
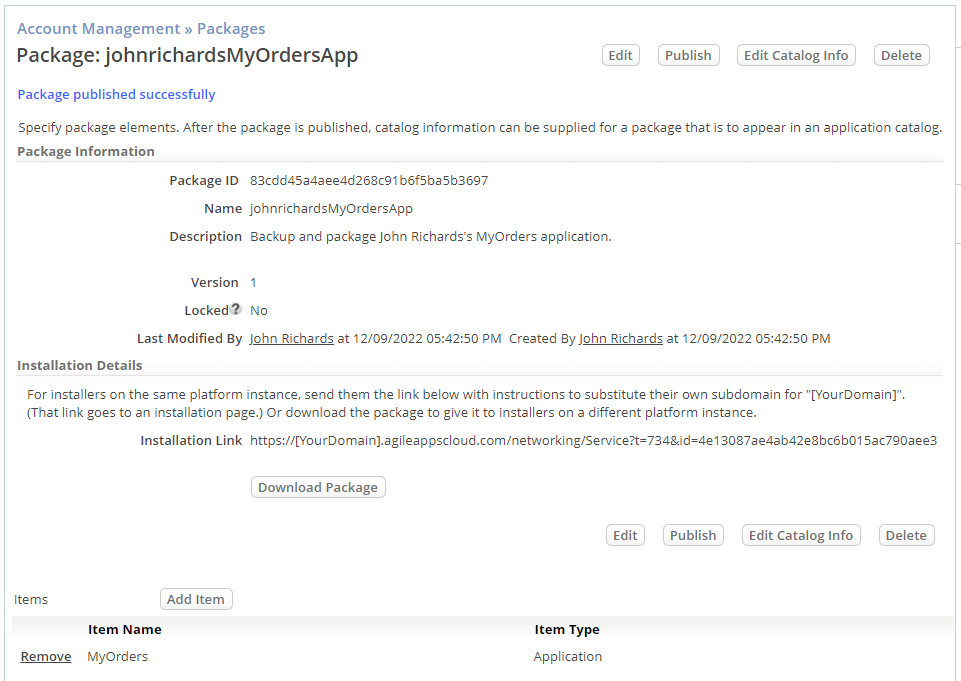
# Click '''Publish''' and click '''Save'''. | # Click '''Publish''' and click '''Save'''.<br><br>[[File:Packaged_App_johnrichardsMyOrders_App.PNG|800px]] | ||
------------------------------------------------------------------------------------------------------------------------------------------------------------------------------------------------------------------------------------------------------------------------ | |||
:{| border="0" align="left" cellpadding="5" cellspacing="1" | |||
| | |||
[[Part 4: Export Data|Previous]] | |||
|} | |||
:{| border="0" align="right" cellpadding="5" cellspacing="1" | |||
| | |||
[[A Step-by-Step Tutorial for Creating a Sample Application in the AgileApps Cloud|Home]] | |||
|} | |||
Latest revision as of 14:18, 14 December 2022
Introduction
Deploying a webMethods AgileApps Application
- A webMethods AgileApps Cloud application can be deployed:
- On the AgileApps public PaaS (Platform-as-a-Service) cloud
- Where you have been executing the course exercises within your own (trial) Tenant
- On-premise installation into an organization’s network environment
- The tenancy structure is still possible
- On the AgileApps public PaaS (Platform-as-a-Service) cloud
- A webMethods AgileApps Cloud application can be deployed:
- To deploy an AgileApps Cloud application:
- Publish a Package (a zip file)
- The Package can contain an entire application, or parts of one
- The Package contains the structure of the application, NOT the data
- Make the Package available to others
- Add the application to the “Marketplace”, where other Tenants can install it
- Put the zip file on the Web or in an email
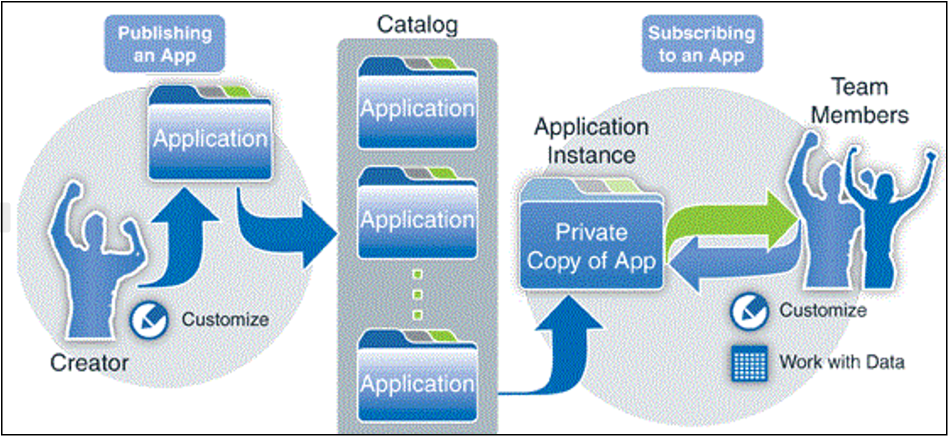
Application Deployment Scenario #1 (of 2)
Publishing Application to "Subscriber" Tenants
- Applications can be shared with Subscribers (other Tenants)
- You publish, they install
- You update, they upgrade
Application Deplayment Scenario #2 (of 2)
From "Dev" to "Test" to "Prod"
- In this scenario, each Tenant environment represents a different stage in the application development and deployment lifecycle
- New things are created in the development (“Dev”) environment
- The “Test” environment is used to ensure that everything continues to work as expected
- When fully tested, the application is rolled out to end-user’s production (“Prod”) environment
- In this scenario, each Tenant environment represents a different stage in the application development and deployment lifecycle
- Sandboxes are designed for that purpose
- Each “Sandbox” is a separate sub Tenant
- Configuration > Administration > Account Management > Sandboxes
- Sandboxes are not available by default - you request it from AgileApps Cloud support
- A Package is directly deployed (rather than waiting for optional subscribe/update)
- Distribution paths can be defined - so a development Tenant can deploy to the test environment, but cannot deploy directly to production
- Each “Sandbox” is a separate sub Tenant
- Sandboxes are designed for that purpose
Packages
- Features
- Dependencies are automatically included
- A Package always contains what it needs to run
- The packaging system was designed to allow a software provider to share an application with subscribers (scenario #1)
- Other Tenants who have installed an earlier version of the Package
- Dependencies are automatically included
- Limitations
- The design did not take into account the need to publish from a development system to a test system, and from test to production (Scenario #2)
- Some things that need to be overwritten in that scenario are left intact, while some that should be left alone are overwritten. For example:
- Email Templates and Team definitions are not overwritten
- Web Services are overwritten (good, except for server targets and login details)
- Global Template Variables are not included in a Package
- Compatibility between cloud and on-premise applications
- To install a Package created on the cloud, you must make sure that the on-premise installation version is the same version as the one on the could when the application Package is generated
- Learn More:
- Features
Exercise
- In this exercise, you create a Package to back up your new Application and all the components that you have developed during this class.
- To do so, you will use the Packages component of “Account Management” to enable packaging, versioning, and promotion of collections of Objects through the application development lifecycle.
Steps
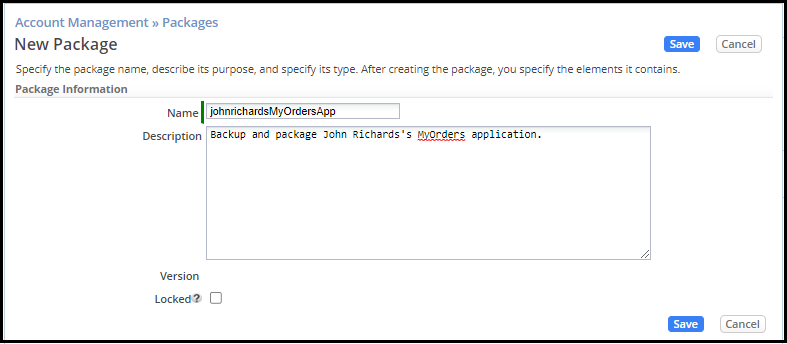
- Navigate to Configuration > Administration > Account Management > Packages and click New Package.
- Type a Name as <your_subdomain>MyOrdersApp and provide a Description as shown:
- Click Save.
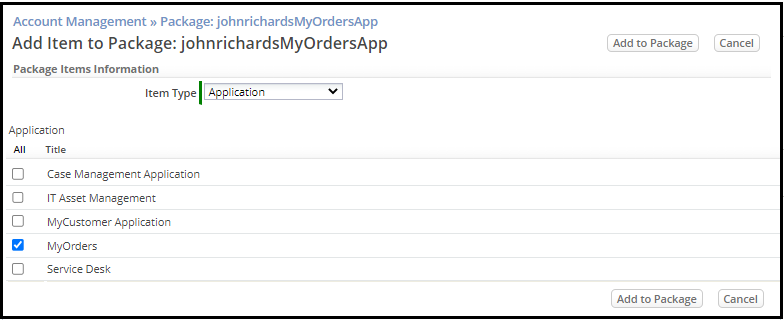
- Click Add Item.
- Choose Item Type as Application and check the box next to the MyOrders application. Click Add to Package.
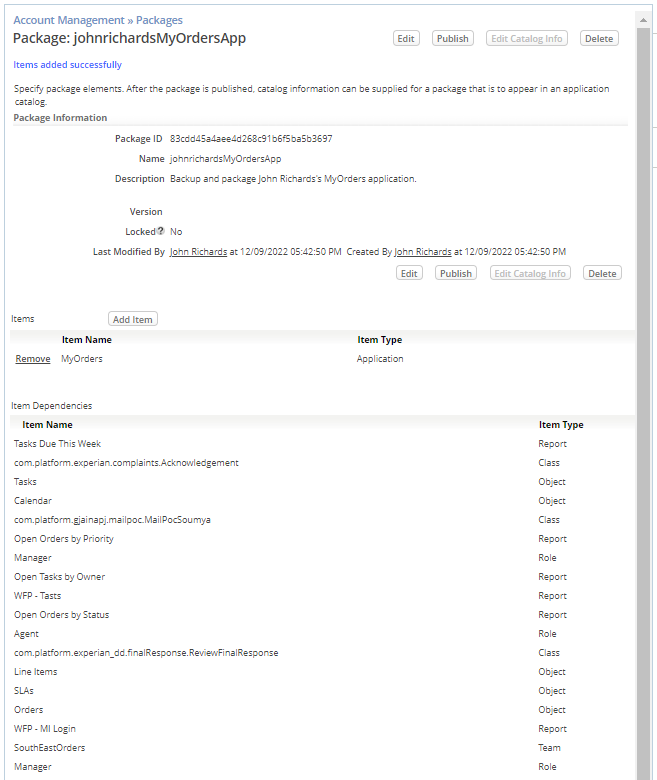
- Review the Objects that are part of the application:
- Click Publish and click Save.
